What are you looking for?
Get help straight from the team at The Big Challenge...
My School
Managing students
Learn how to manage student accounts on The Big Challenge platform. This guide explains how to create, update, and delete student profiles, reset passwords, move students between classes, and export student information while ensuring data security.
Updated 6 days ago
Table of Contents
1. Configuring Student Accounts
Welcome to The Big Challenge! In this tutorial, we will guide you through the simple steps to add students to your class.
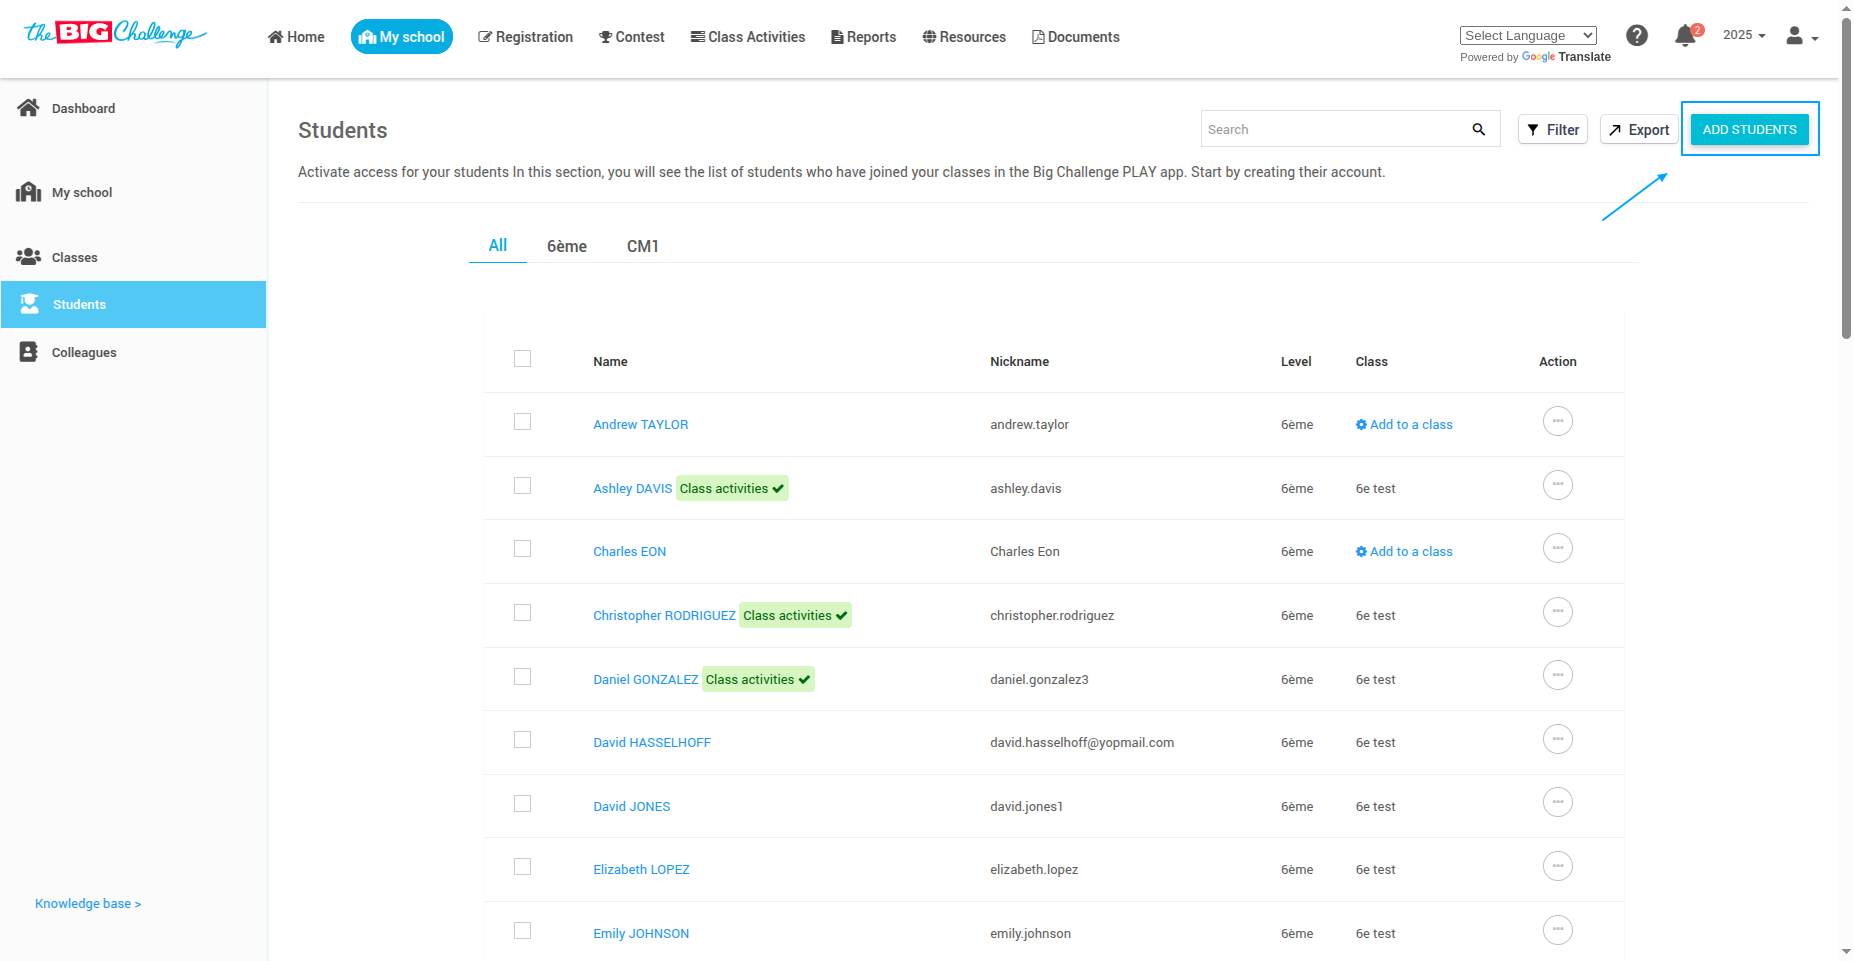
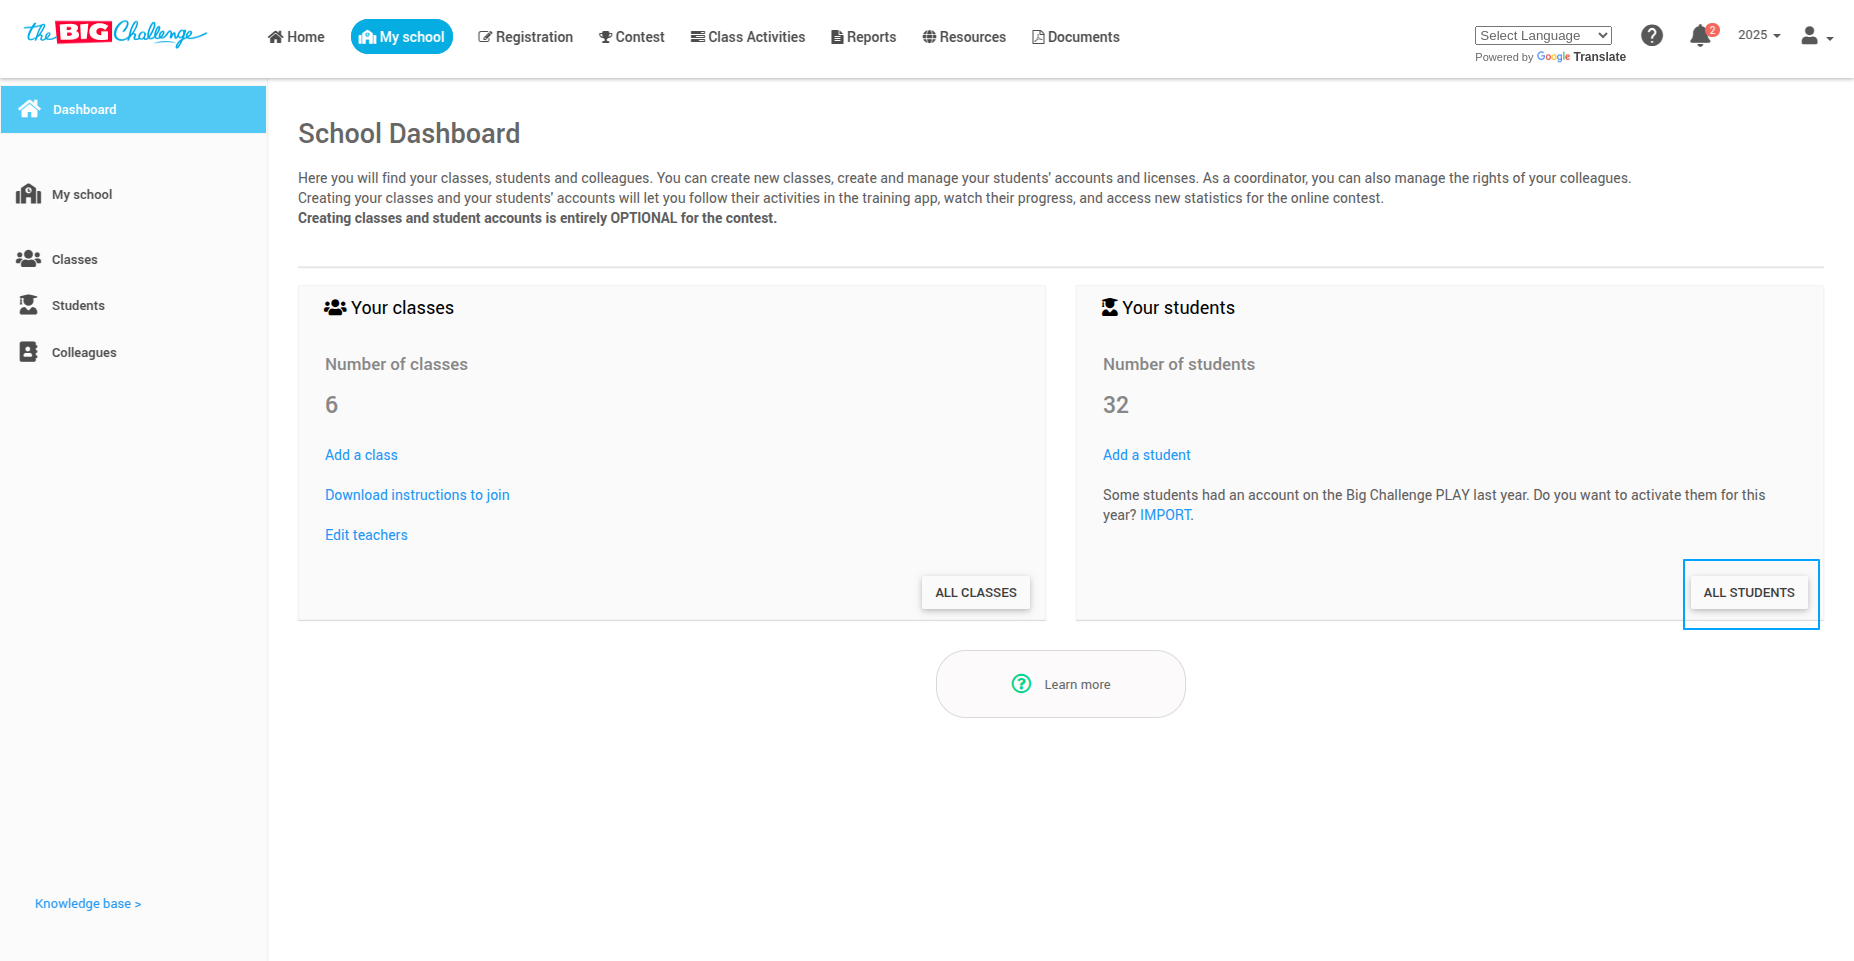
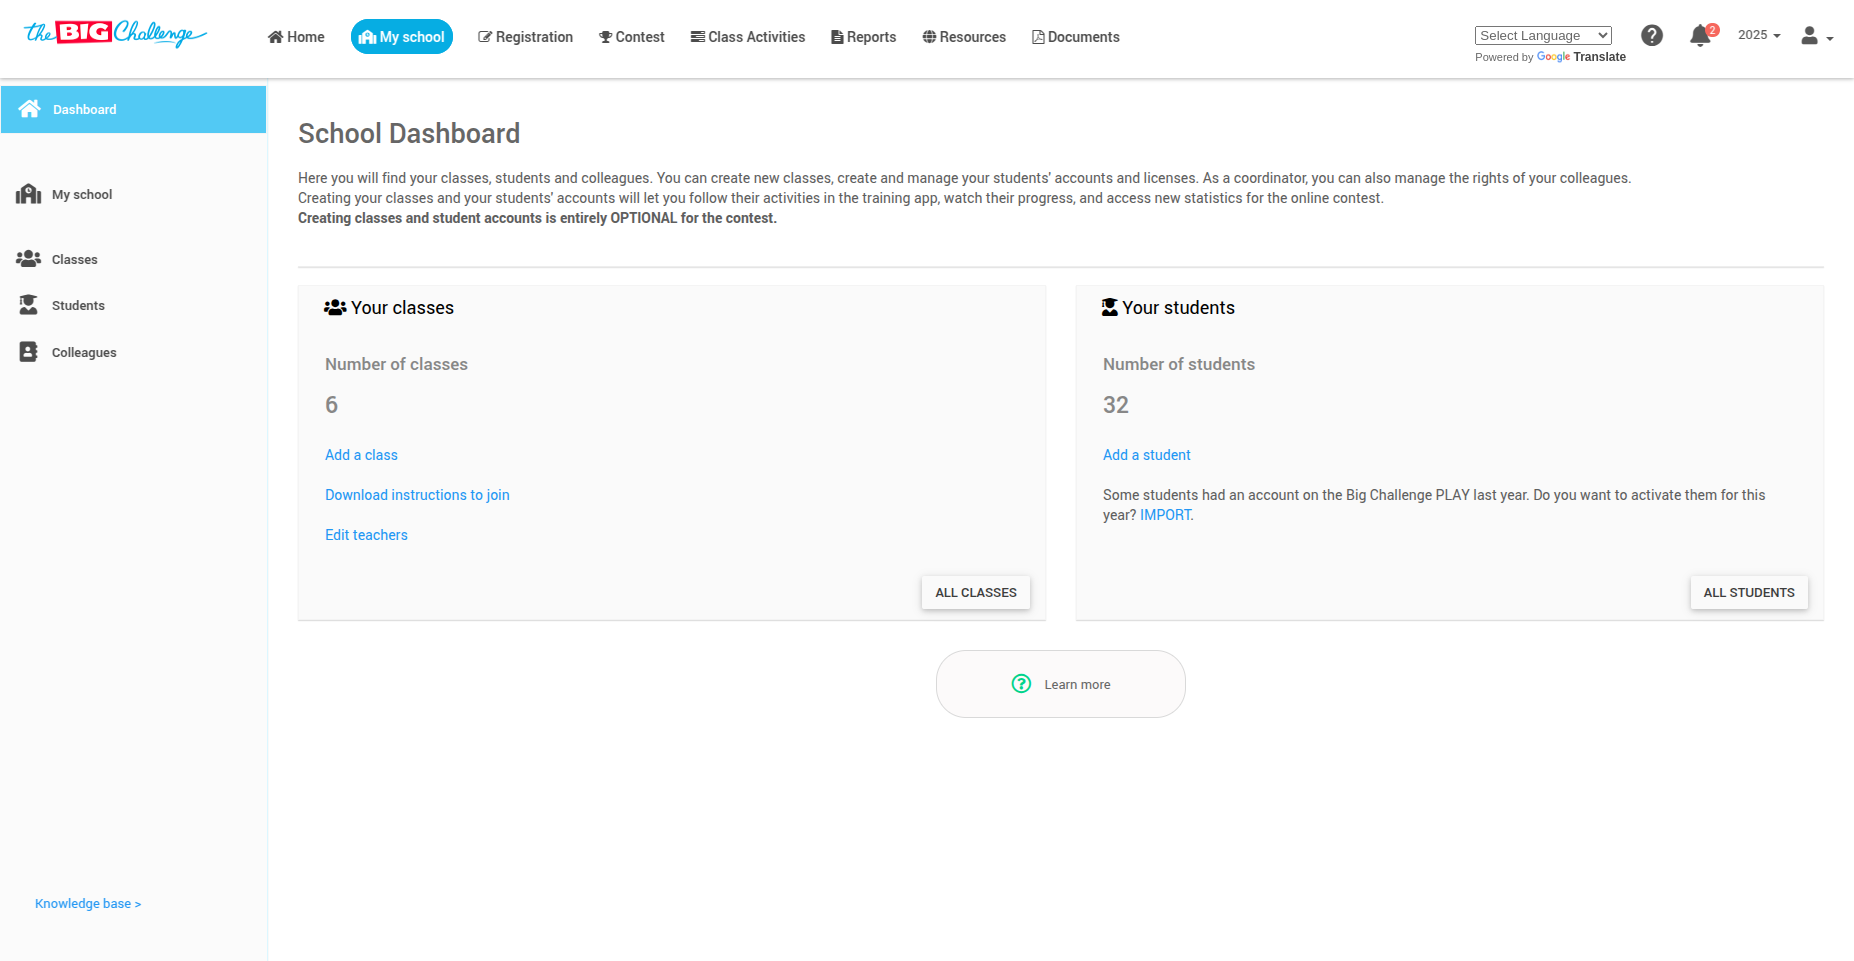
🔐 Step 1: Access the Student Dashboard
Log in to your Teacher Account and go to the My School tab to access your school dashboard. If you haven't created a class yet, please refer to the Organising Classes tutorial.

👥 Step 2: Open the Add Student Panel
On the right side of the page, locate the Your Students section and click Add a student to continue.
🏷️ Step 3: Select a Class
From the dropdown, select the appropriate class you'd like to add students to.
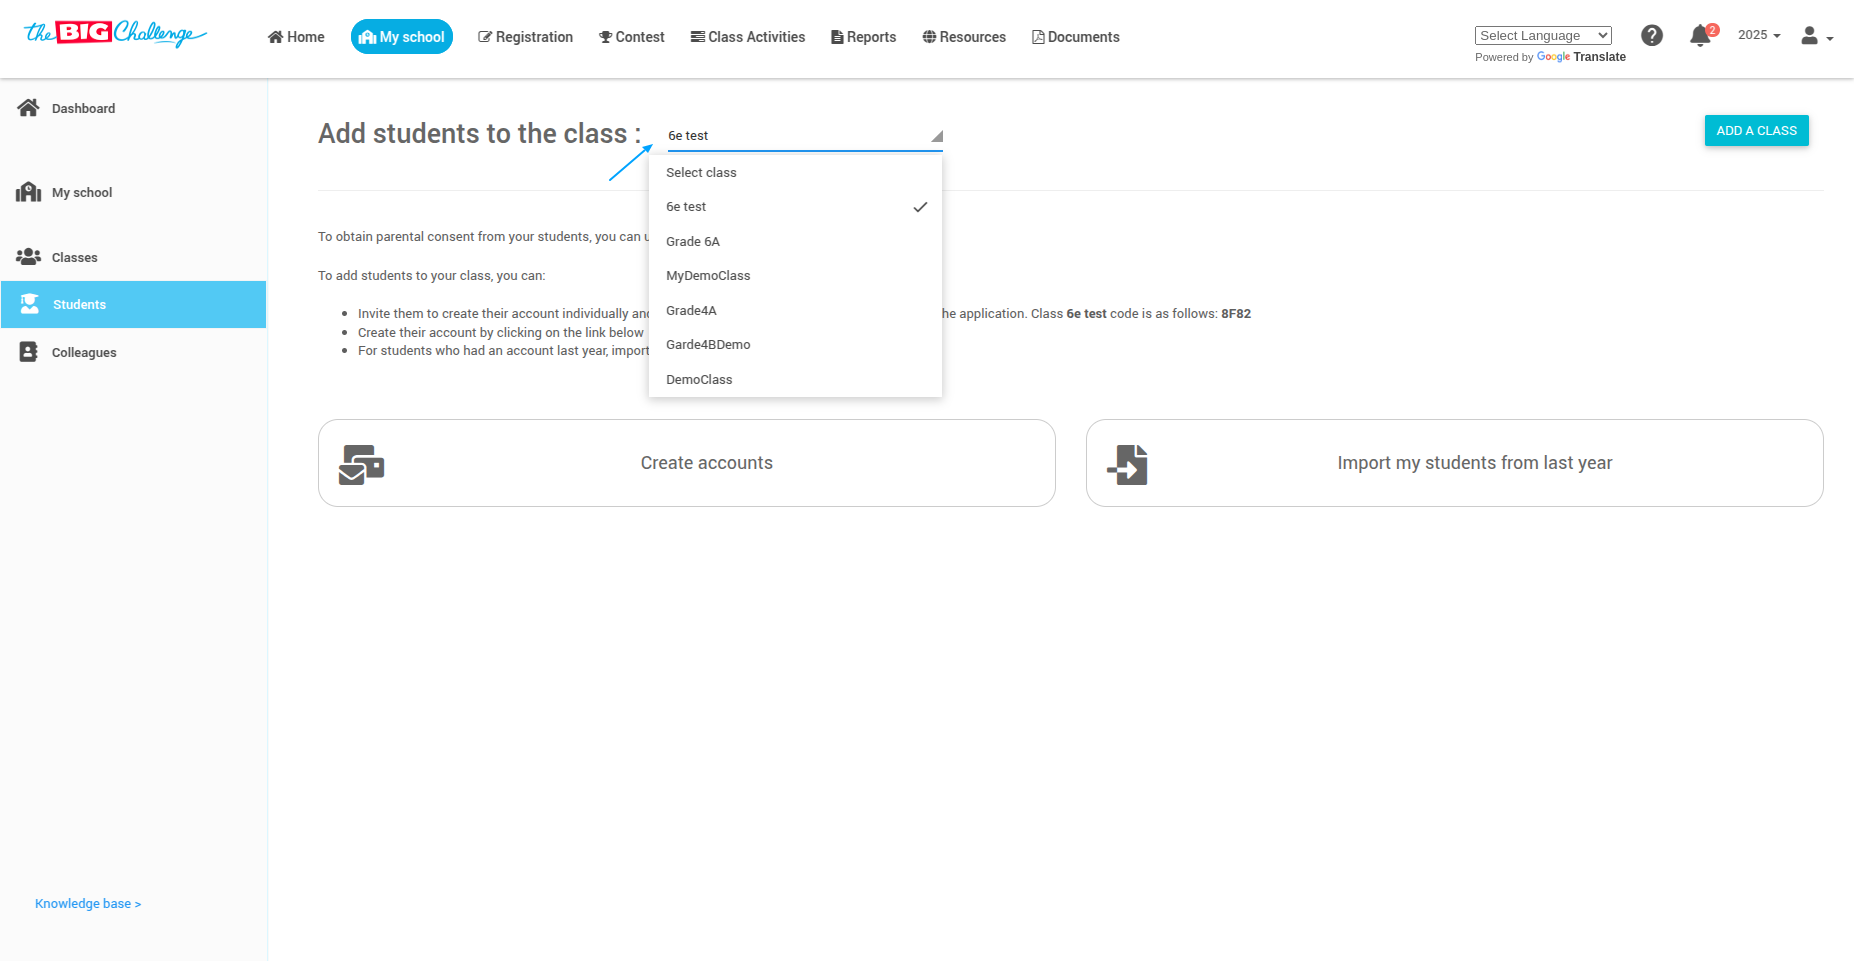
📌 Step 4: Choose a Method to Add Students
You have three options for adding students:
🔄 Option 1: Import Students from Last Year
If your students had accounts last year, click Import my students from last year.
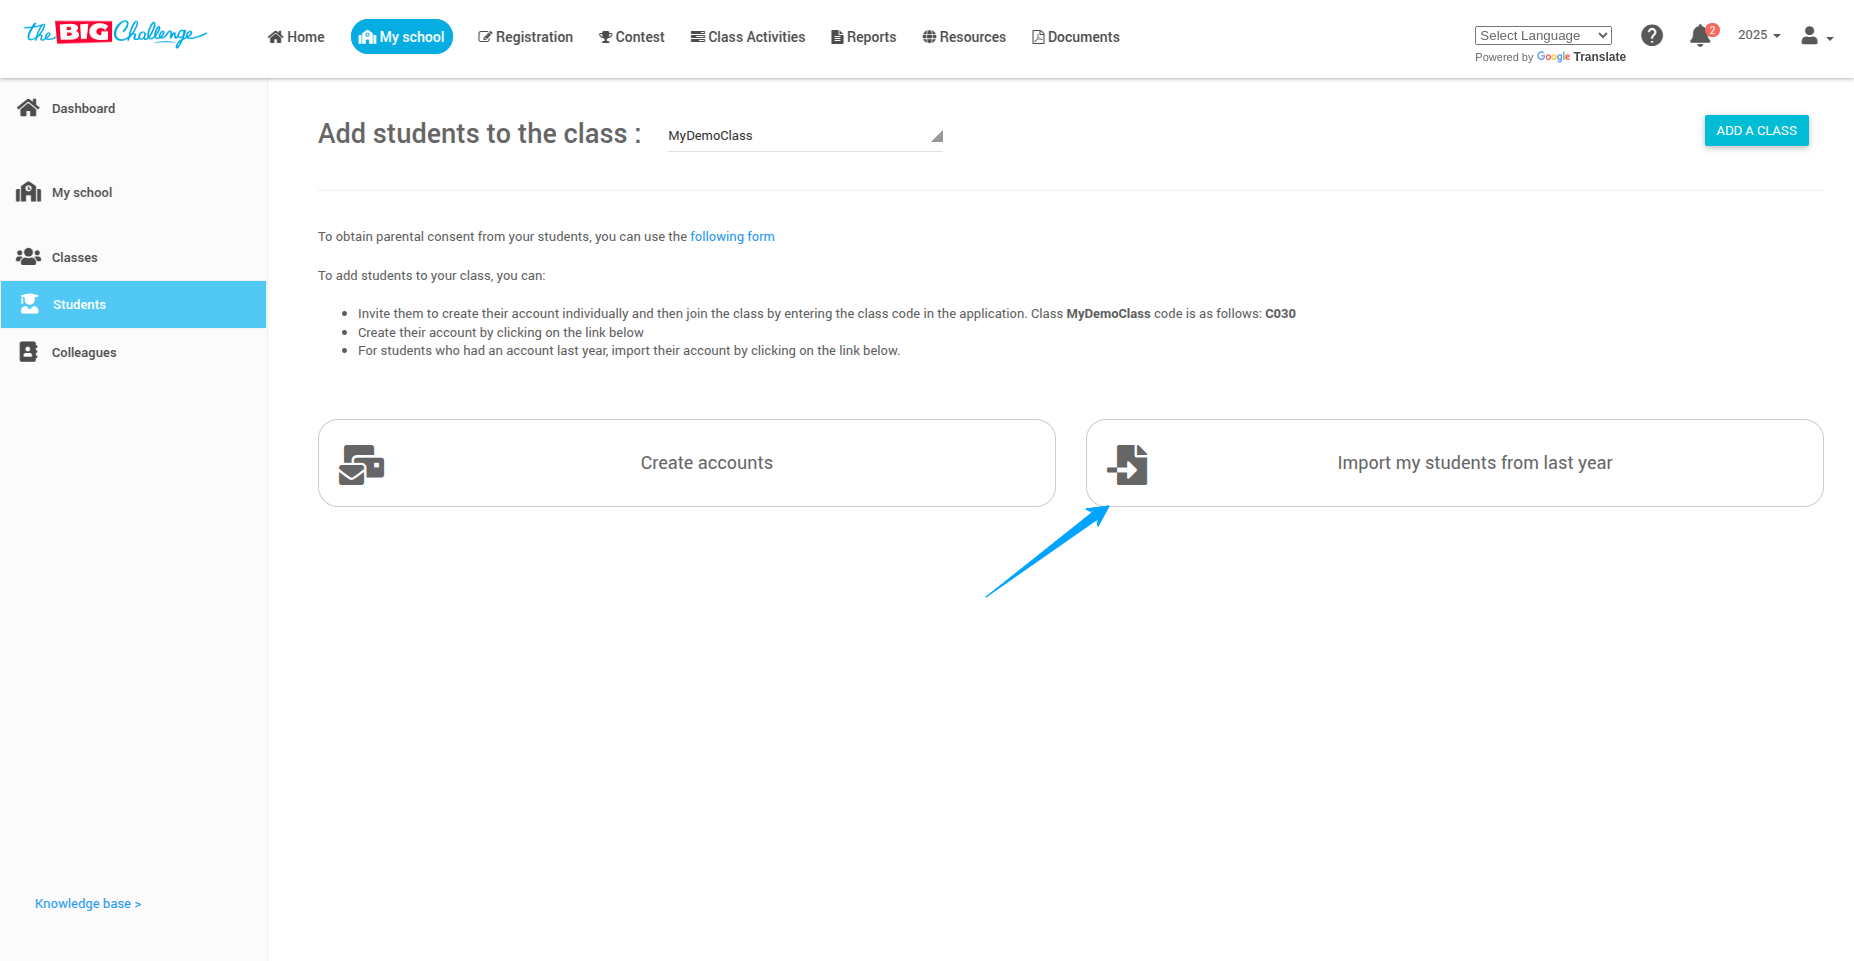
Select the students you want to import and click Import Students. Their accounts will be brought into the class.

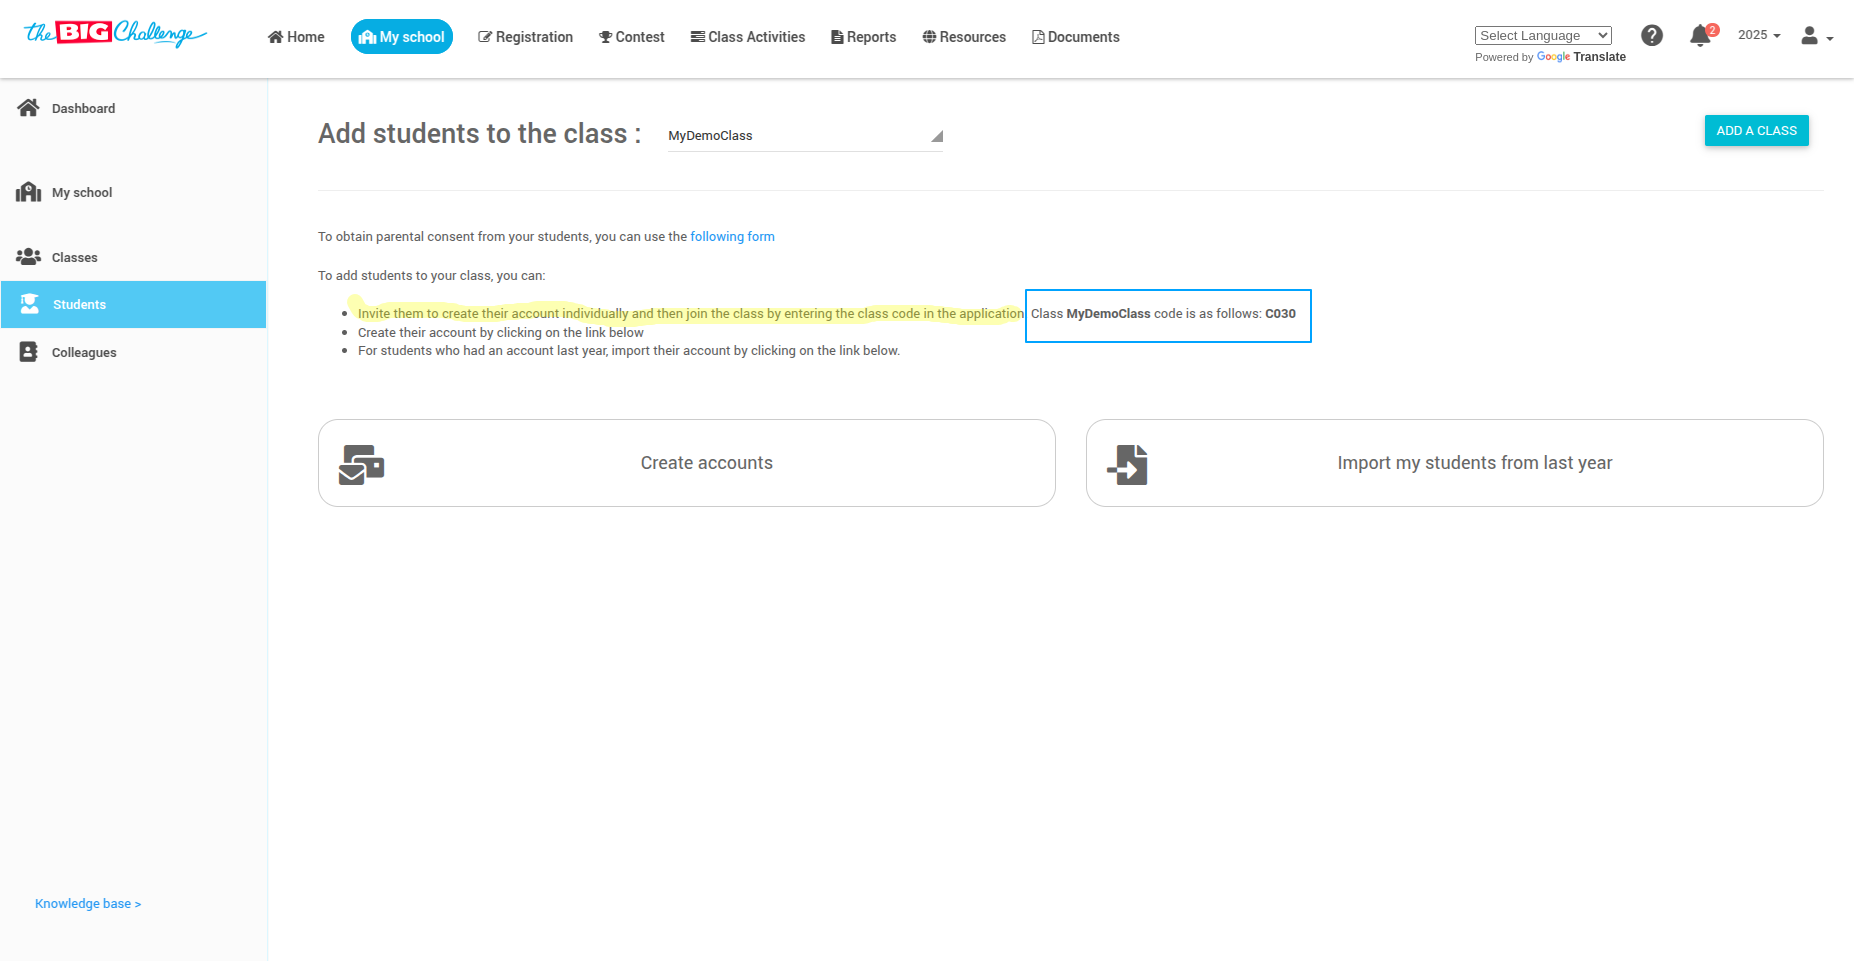
💌 Option 2: Invite Students to Join
Students can create their accounts using the class code available on the class page.
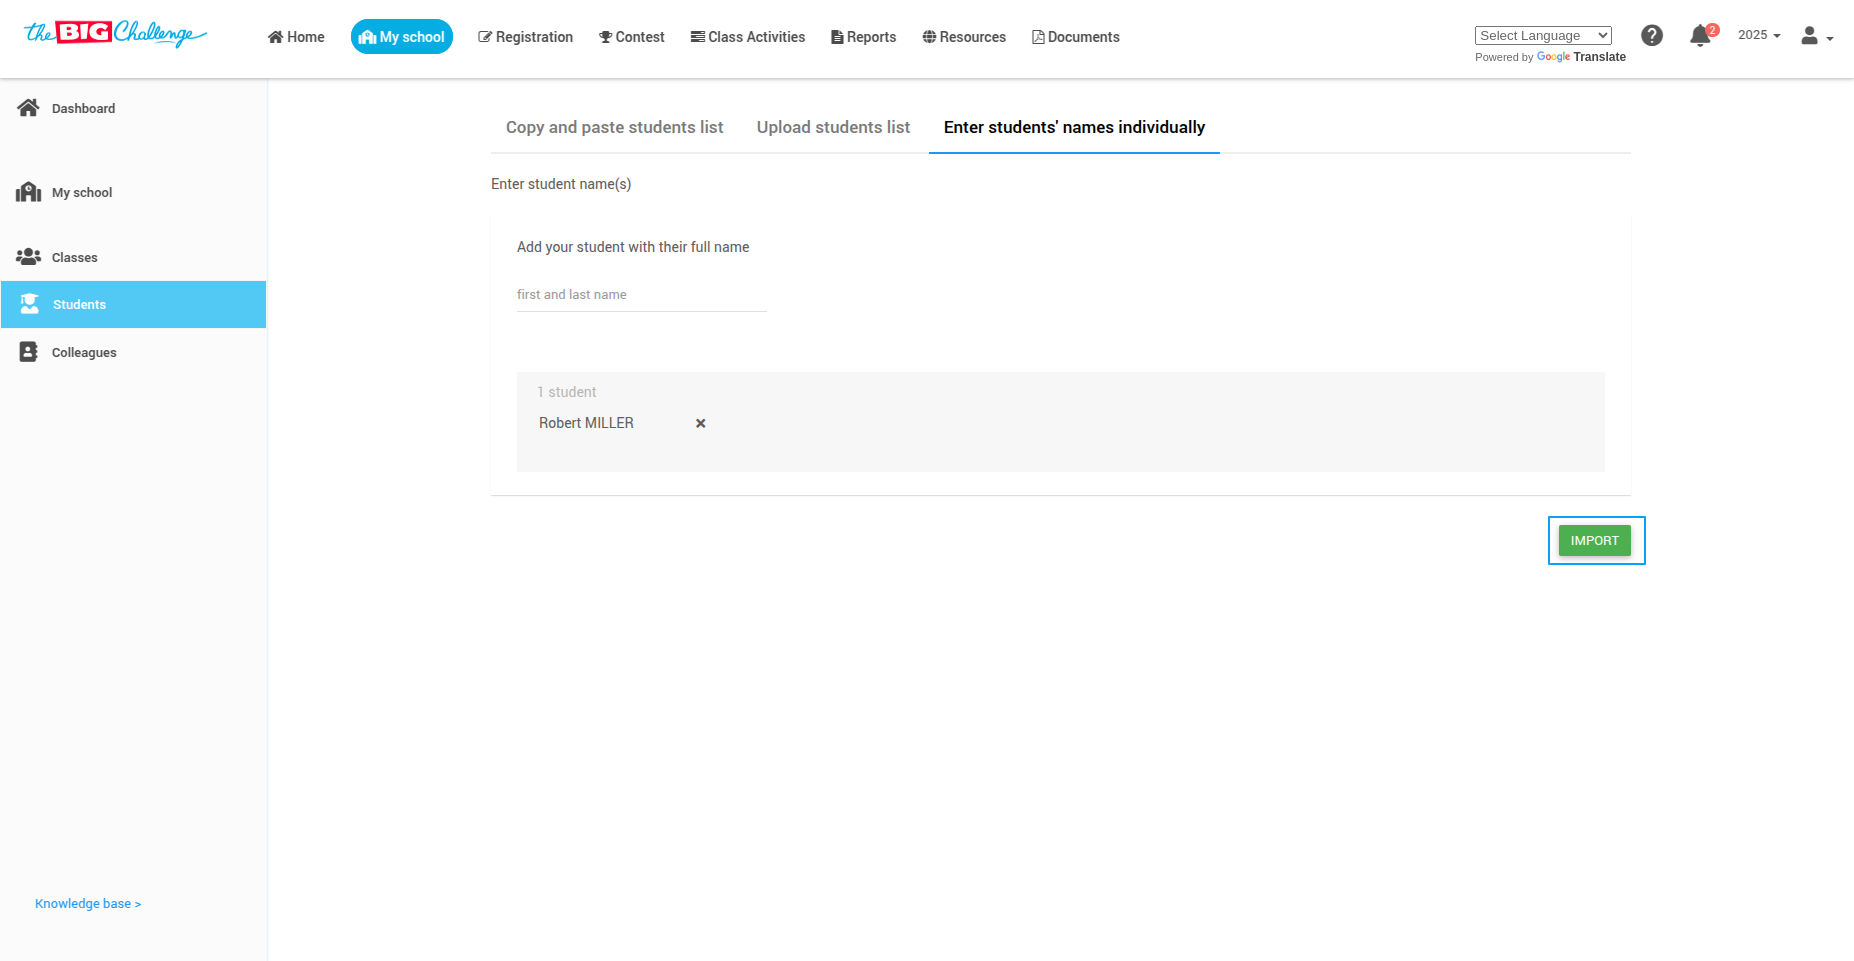
✍️ Option 3: Create Accounts Manually
Click Create account. You can:
📋 Copy and paste a list of student names
📁 Upload a file with first and last names
✏️ Manually enter student names one by one

📥 Step 5: Import and Enable Access
Once you've entered the names, click Import.
You will see the list of added students. If you've already purchased Class Activity Licenses, enable access by selecting Yes in the Access to Class Activities dropdown.
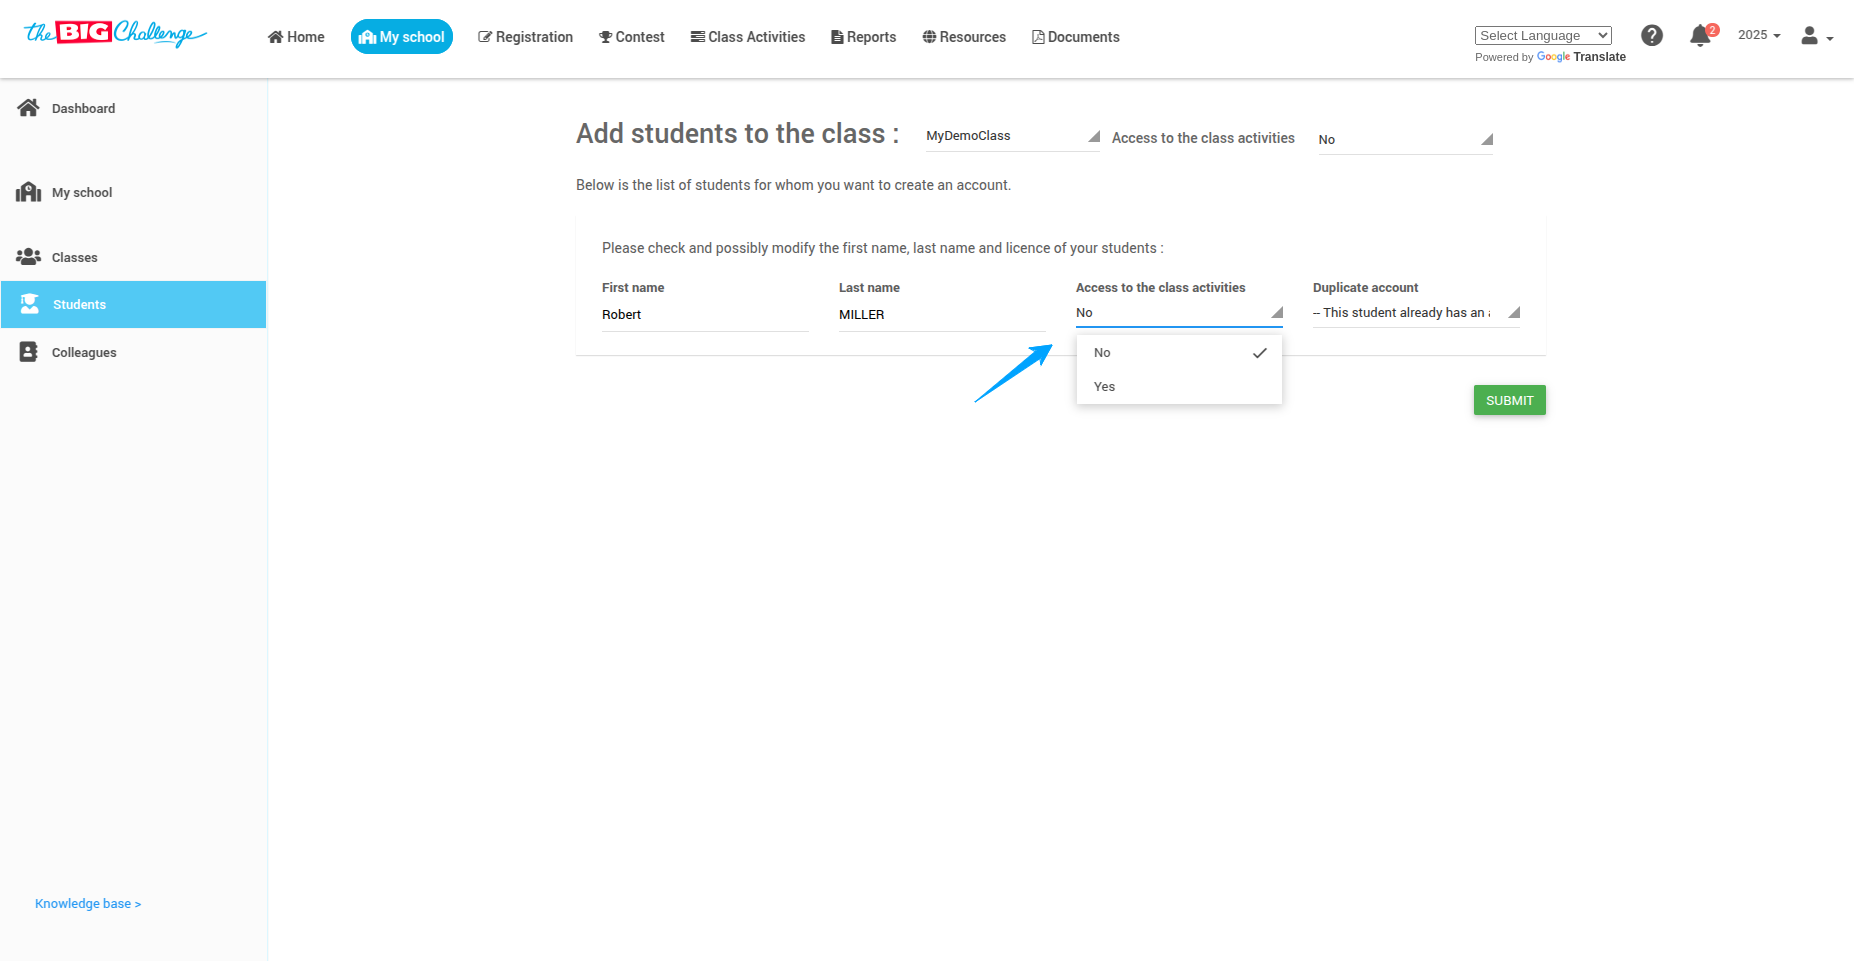
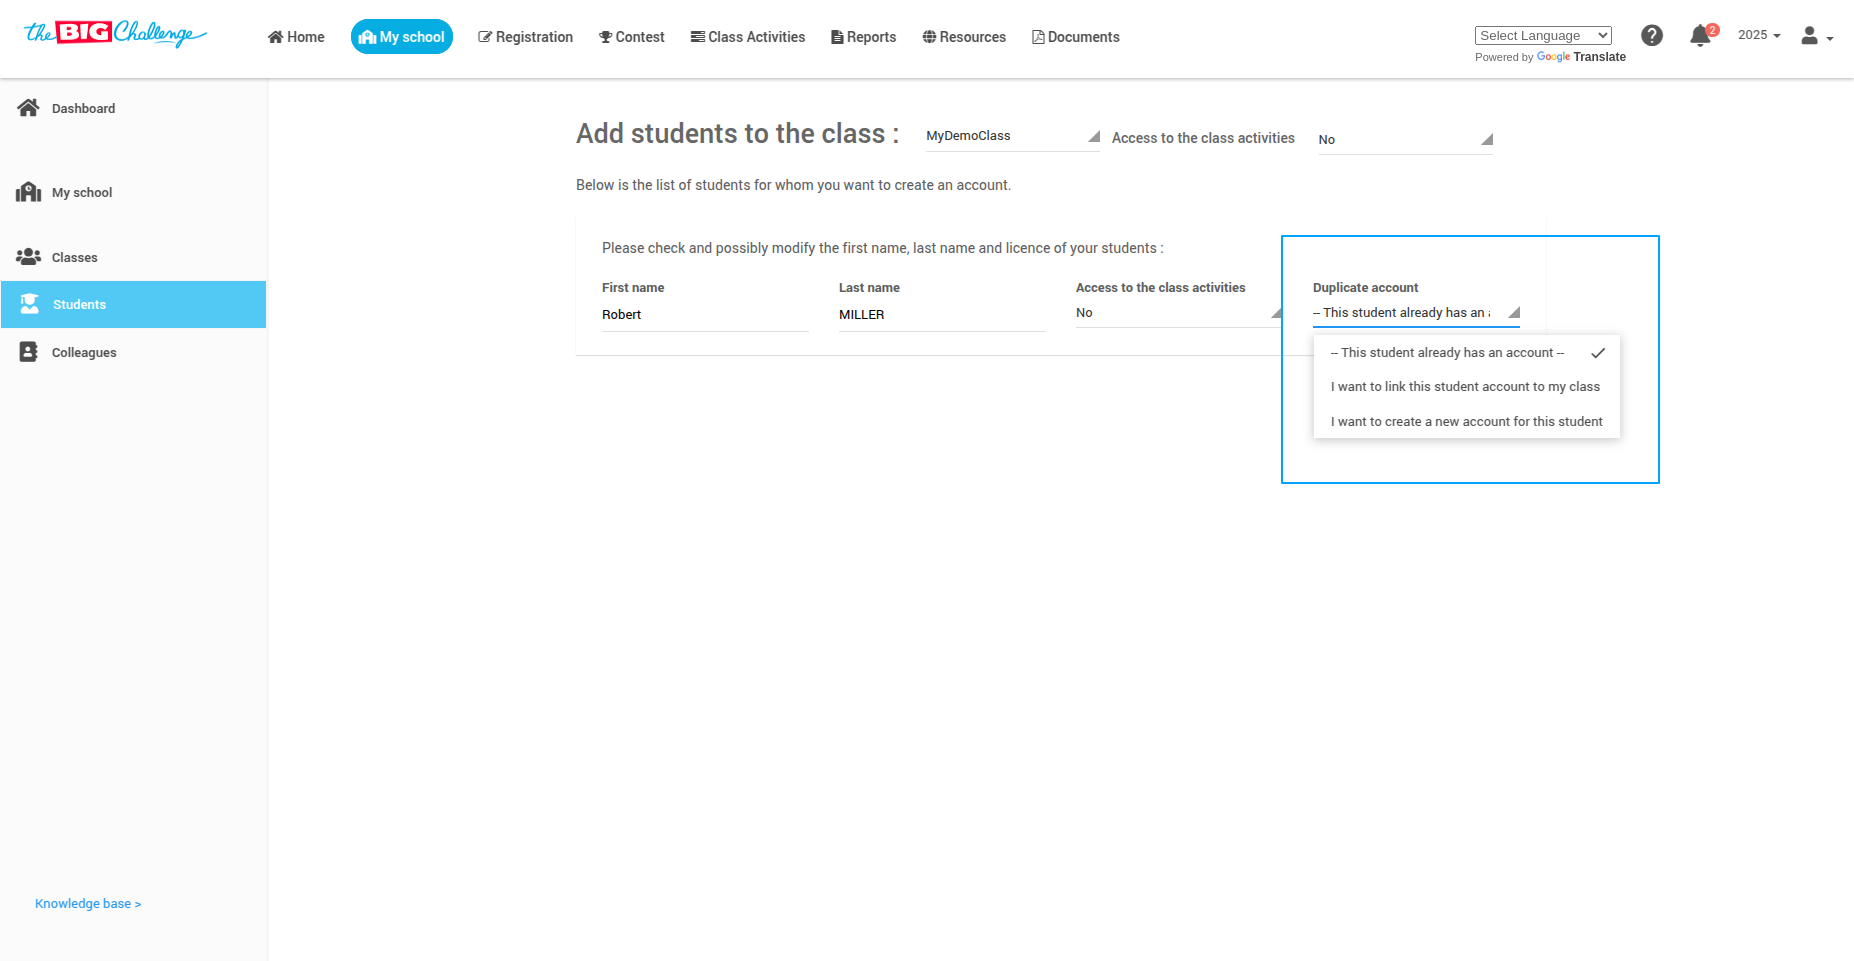
🔁 Step 6: Handle Duplicate Accounts
If a student already has an account, a message will appear. Choose either to link this account to my class, or I want to create a new account.
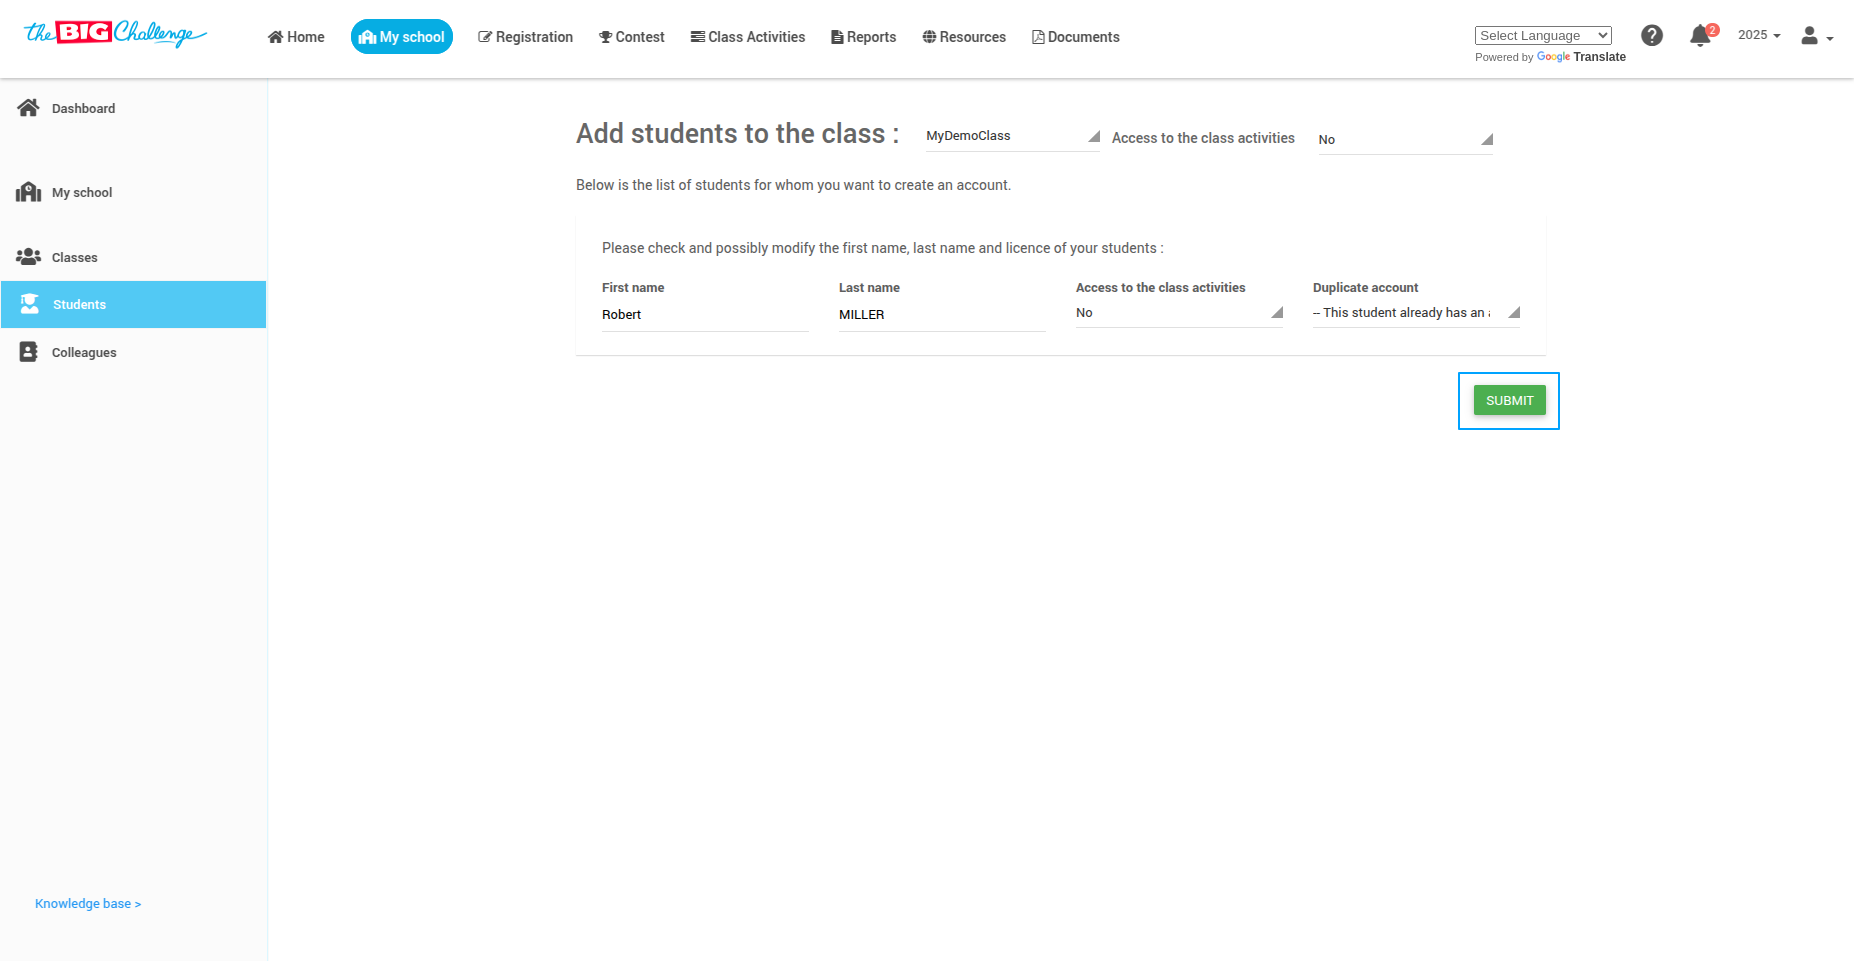
🔎 Step 7: Review and Submit
Carefully review your list and then click Submit.
🔐 Step 8: Download Login Instructions
Click the Download Instructions to Join button at the bottom of the student list. Share these instructions with your students to help them access their accounts easily.
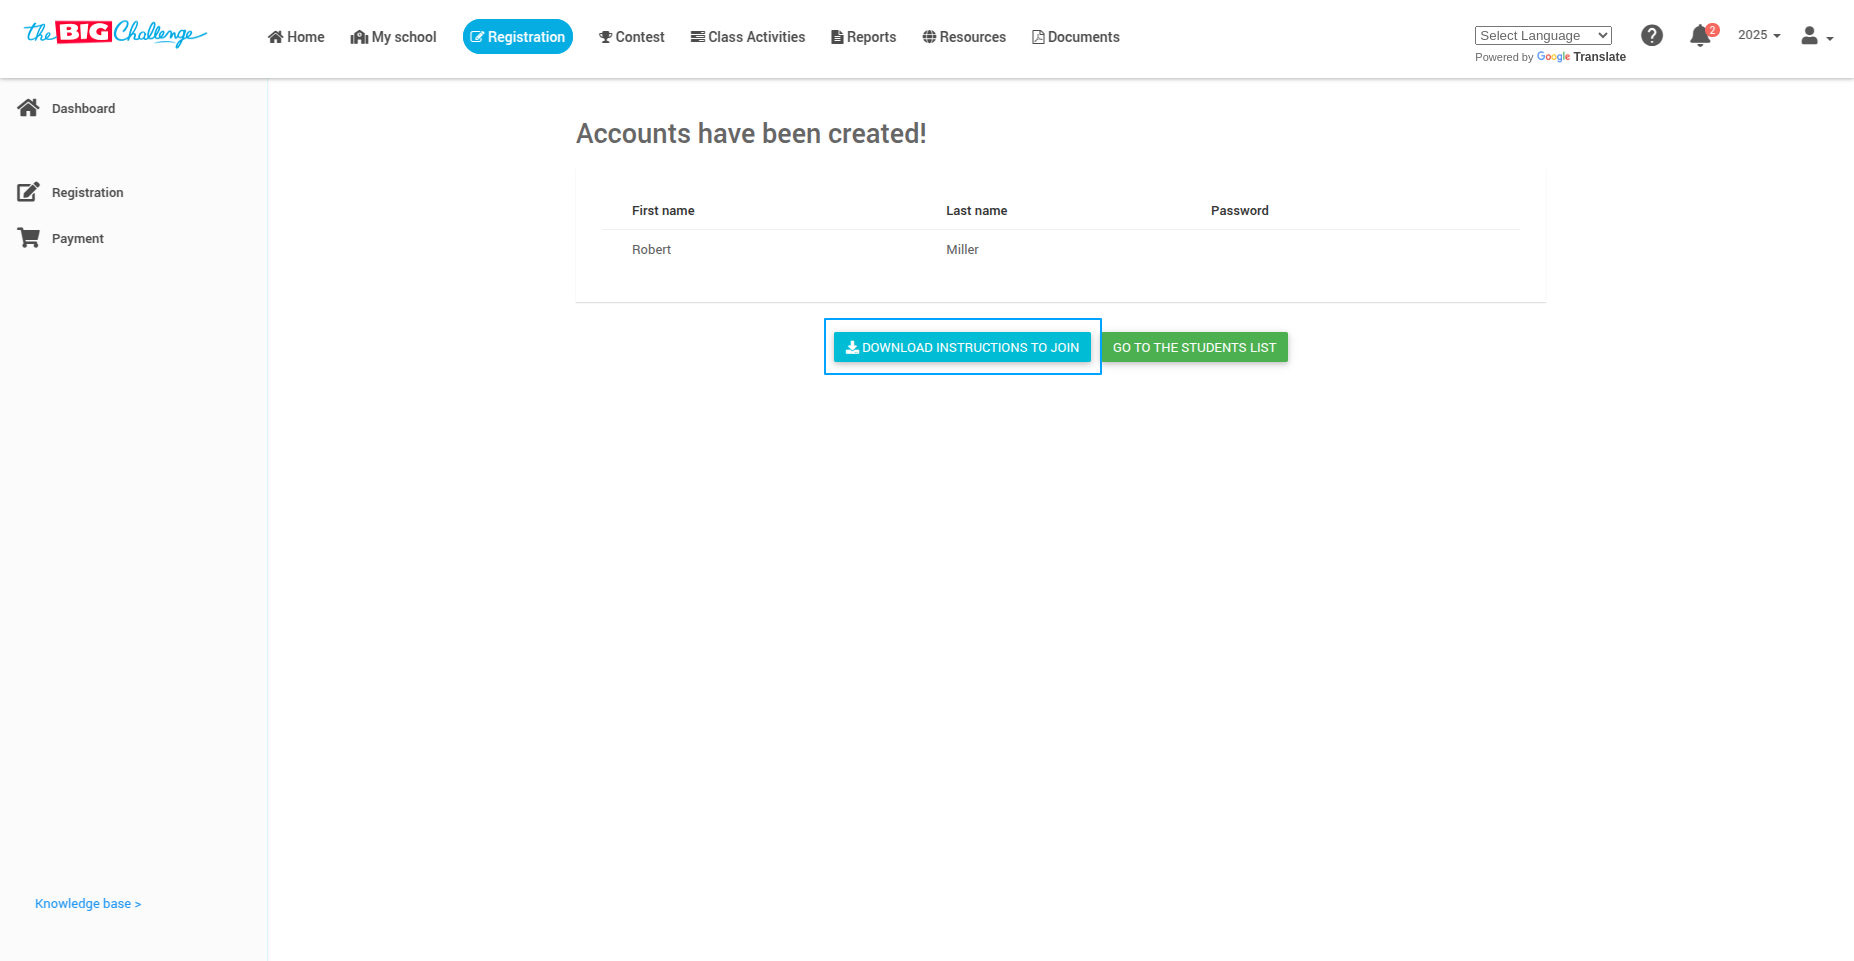
⚠️ Note: Only temporary passwords will be shown in the document. Passwords chosen by students are never displayed.
🎉 All Set!
Your students are ready to join the class and begin their learning journey.
🎥 Watch the Full Tutorial
2. Accessing Student Logins
Welcome to The Big Challenge! This tutorial will guide you on accessing student login credentials when students have trouble logging in.
🔐 Step 1: Access the School Dashboard
Log in to your teacher account and click on the My School tab. You will be directed to your school dashboard.

👥 Step 2: View All Students
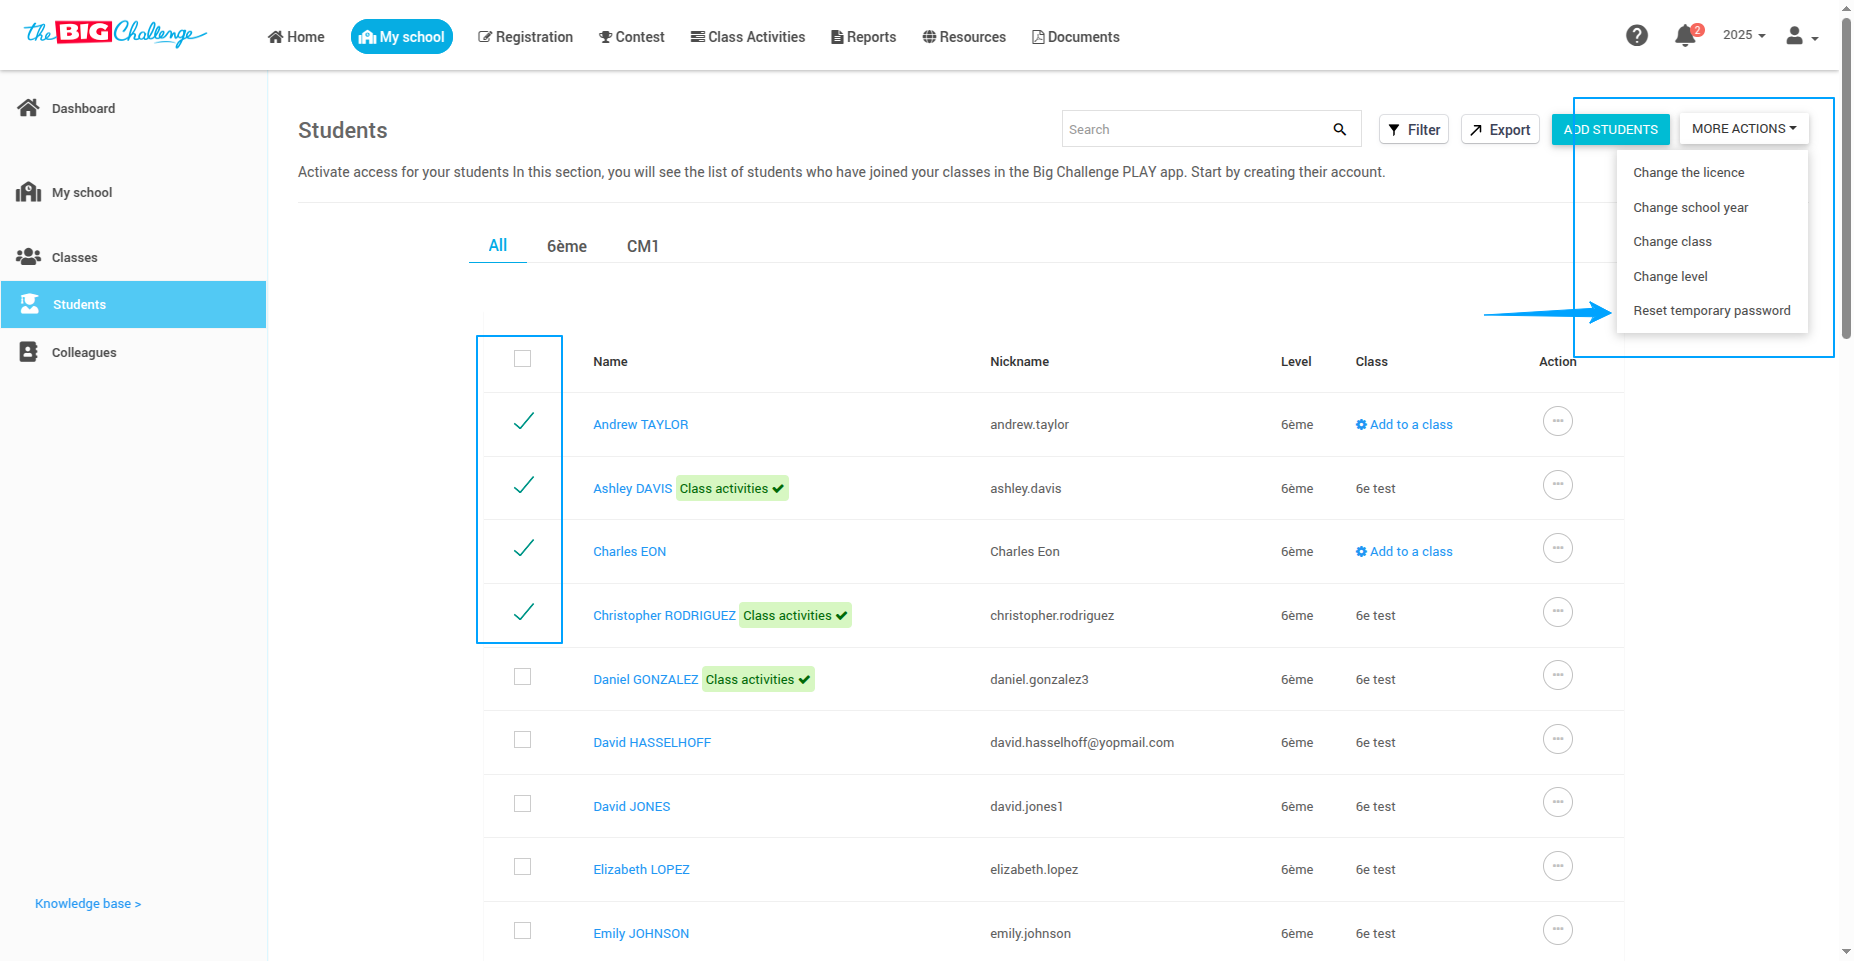
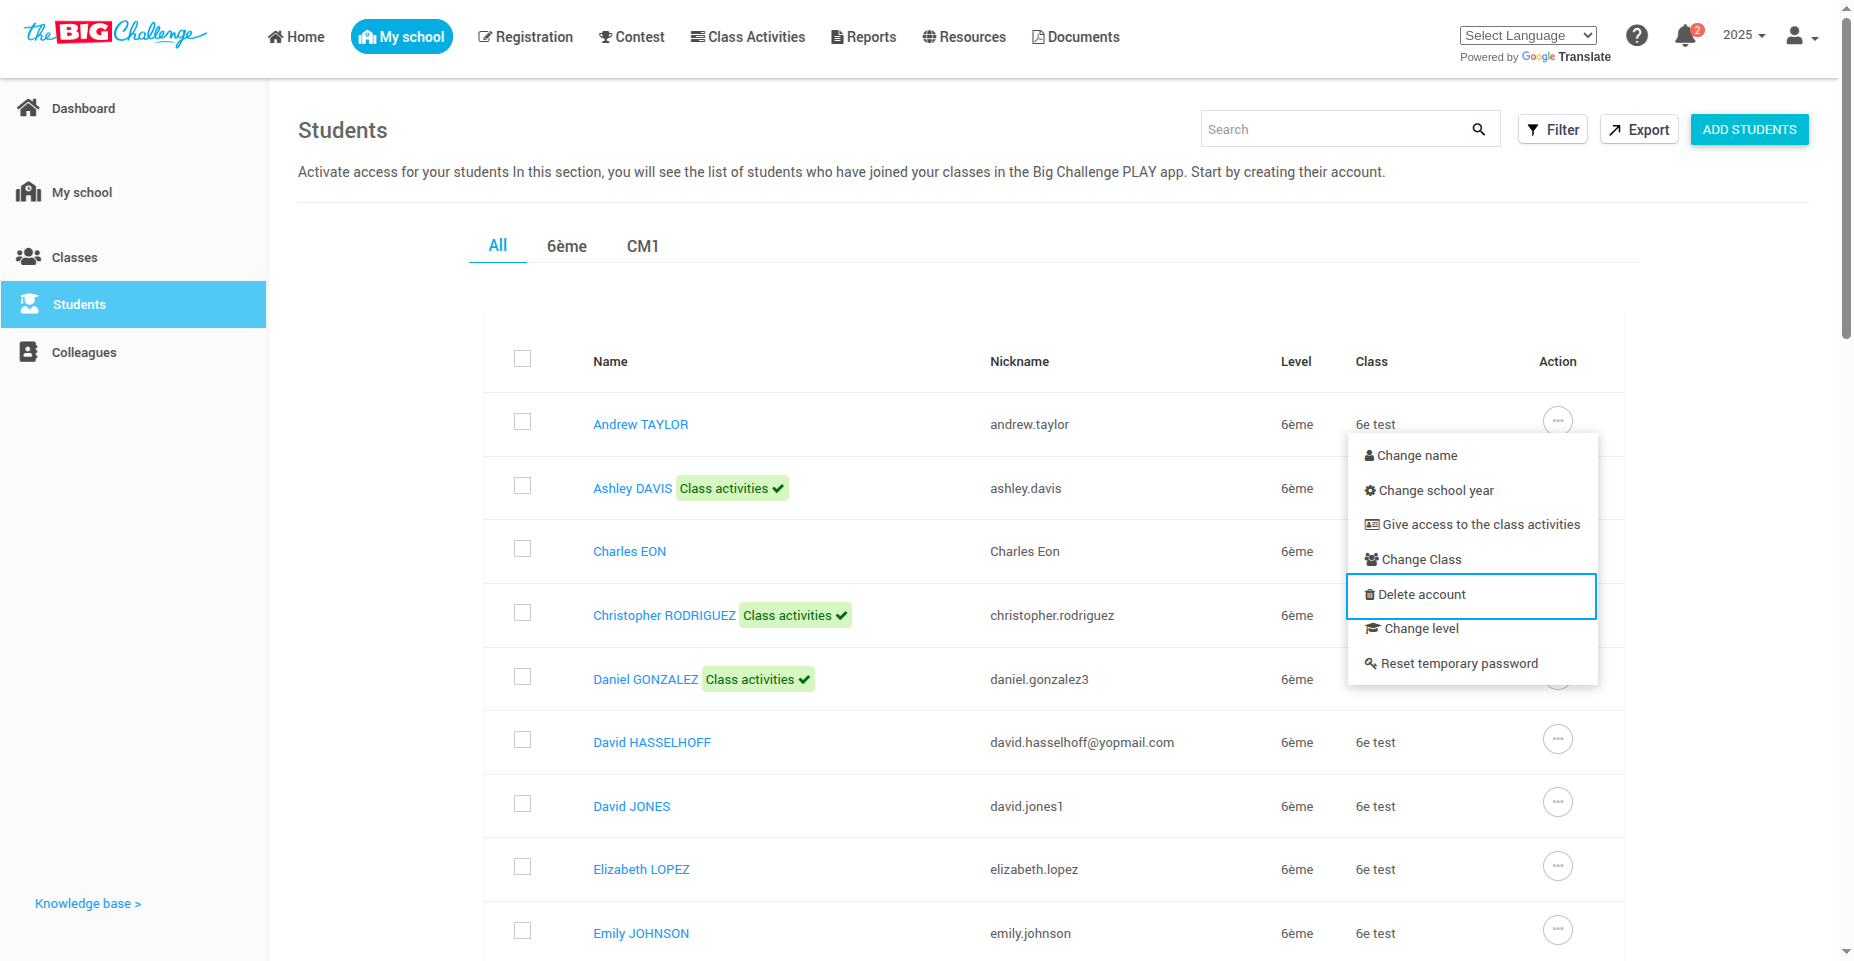
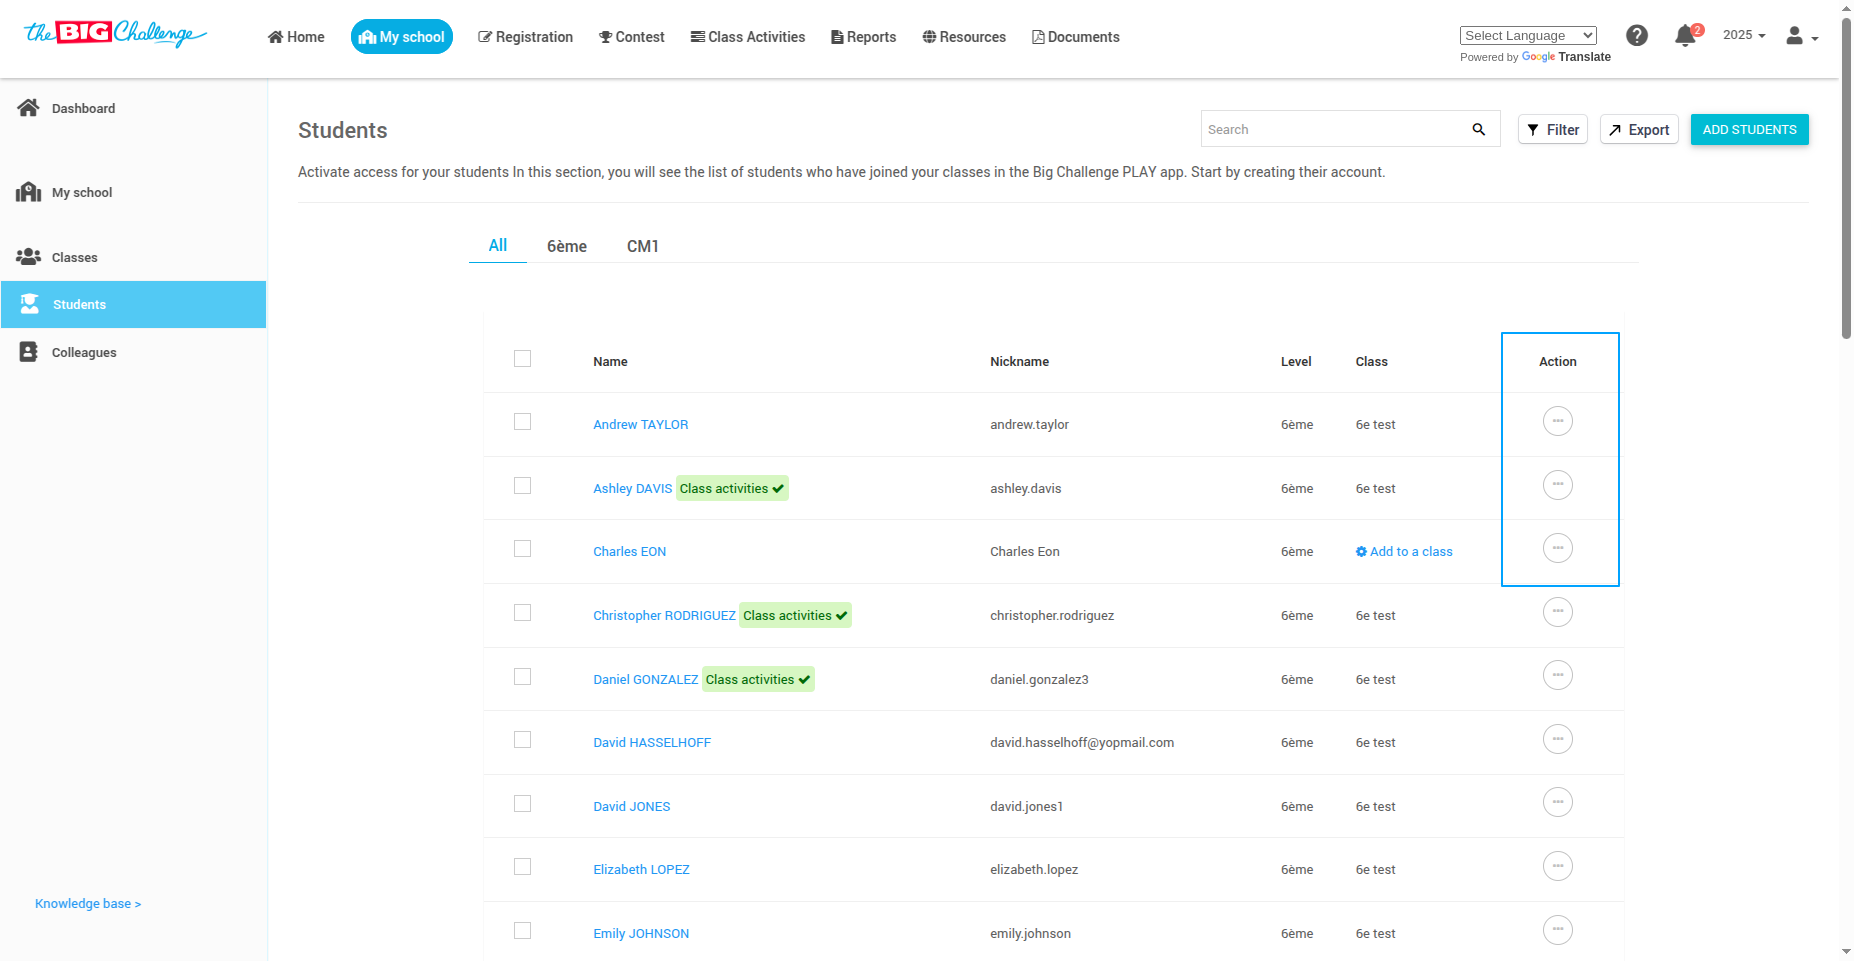
On the right side of the page, locate and click All Students. You will see a list of all students organized by level.
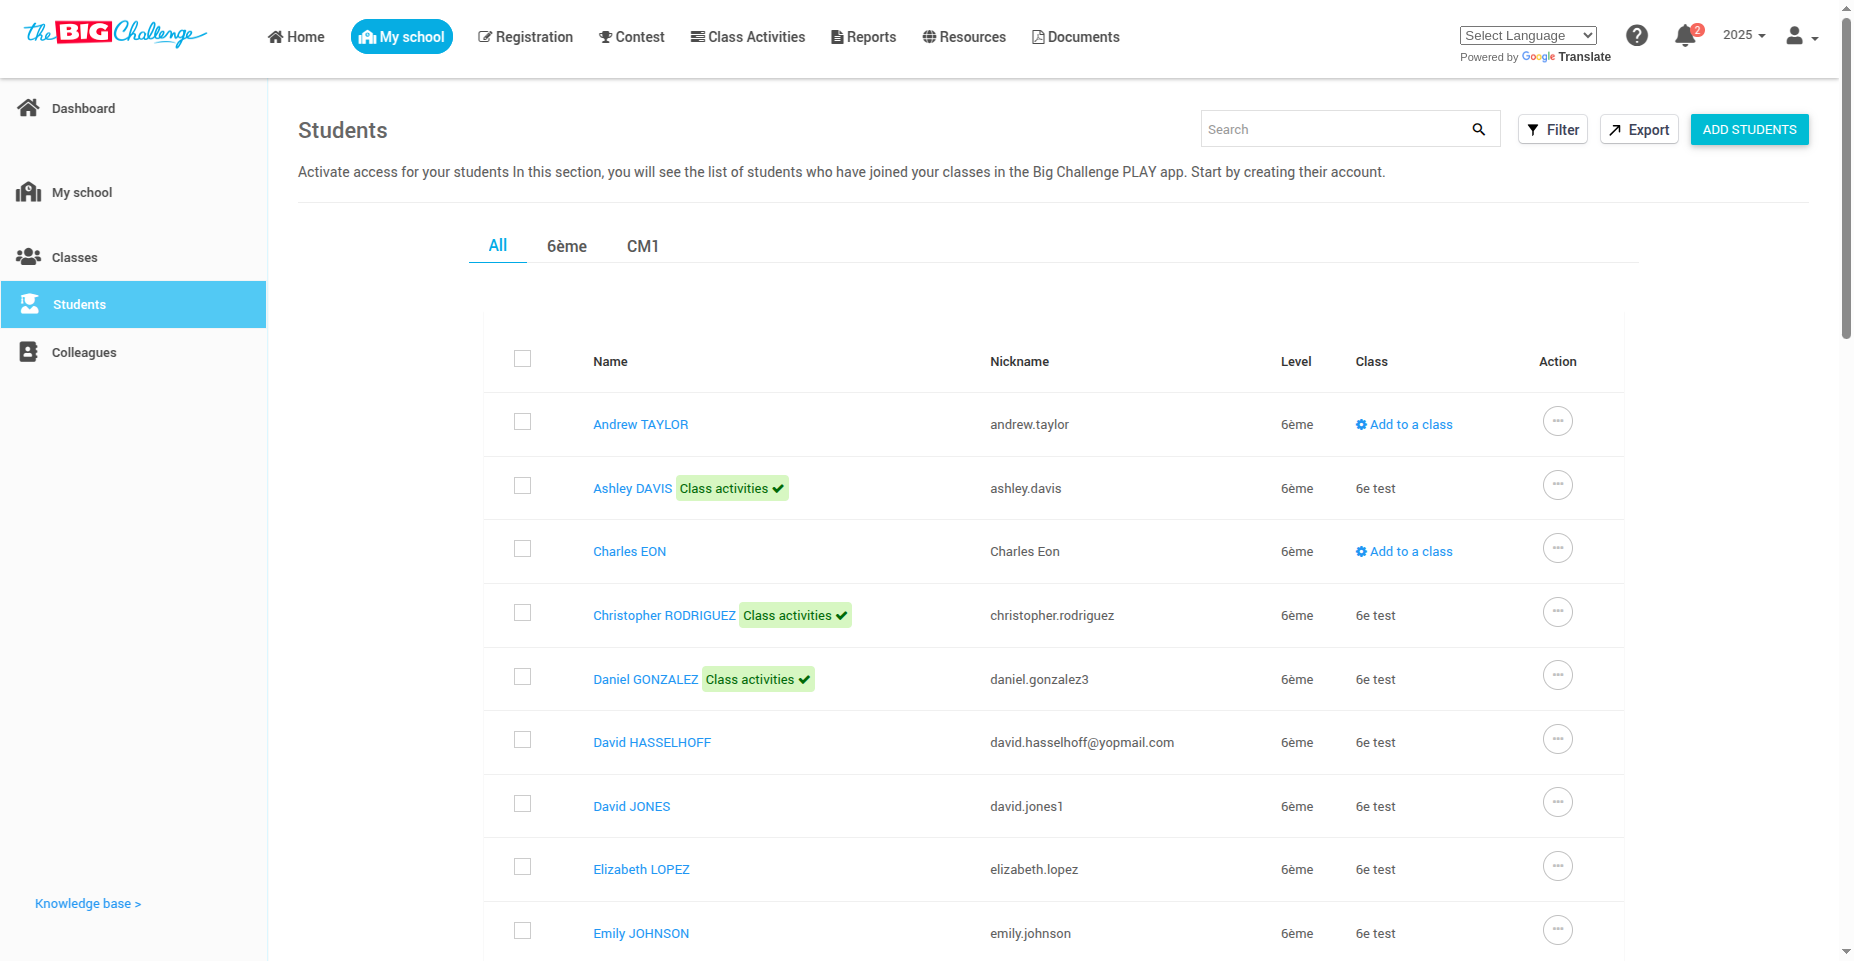
🧩 Step 3: Open Student Details
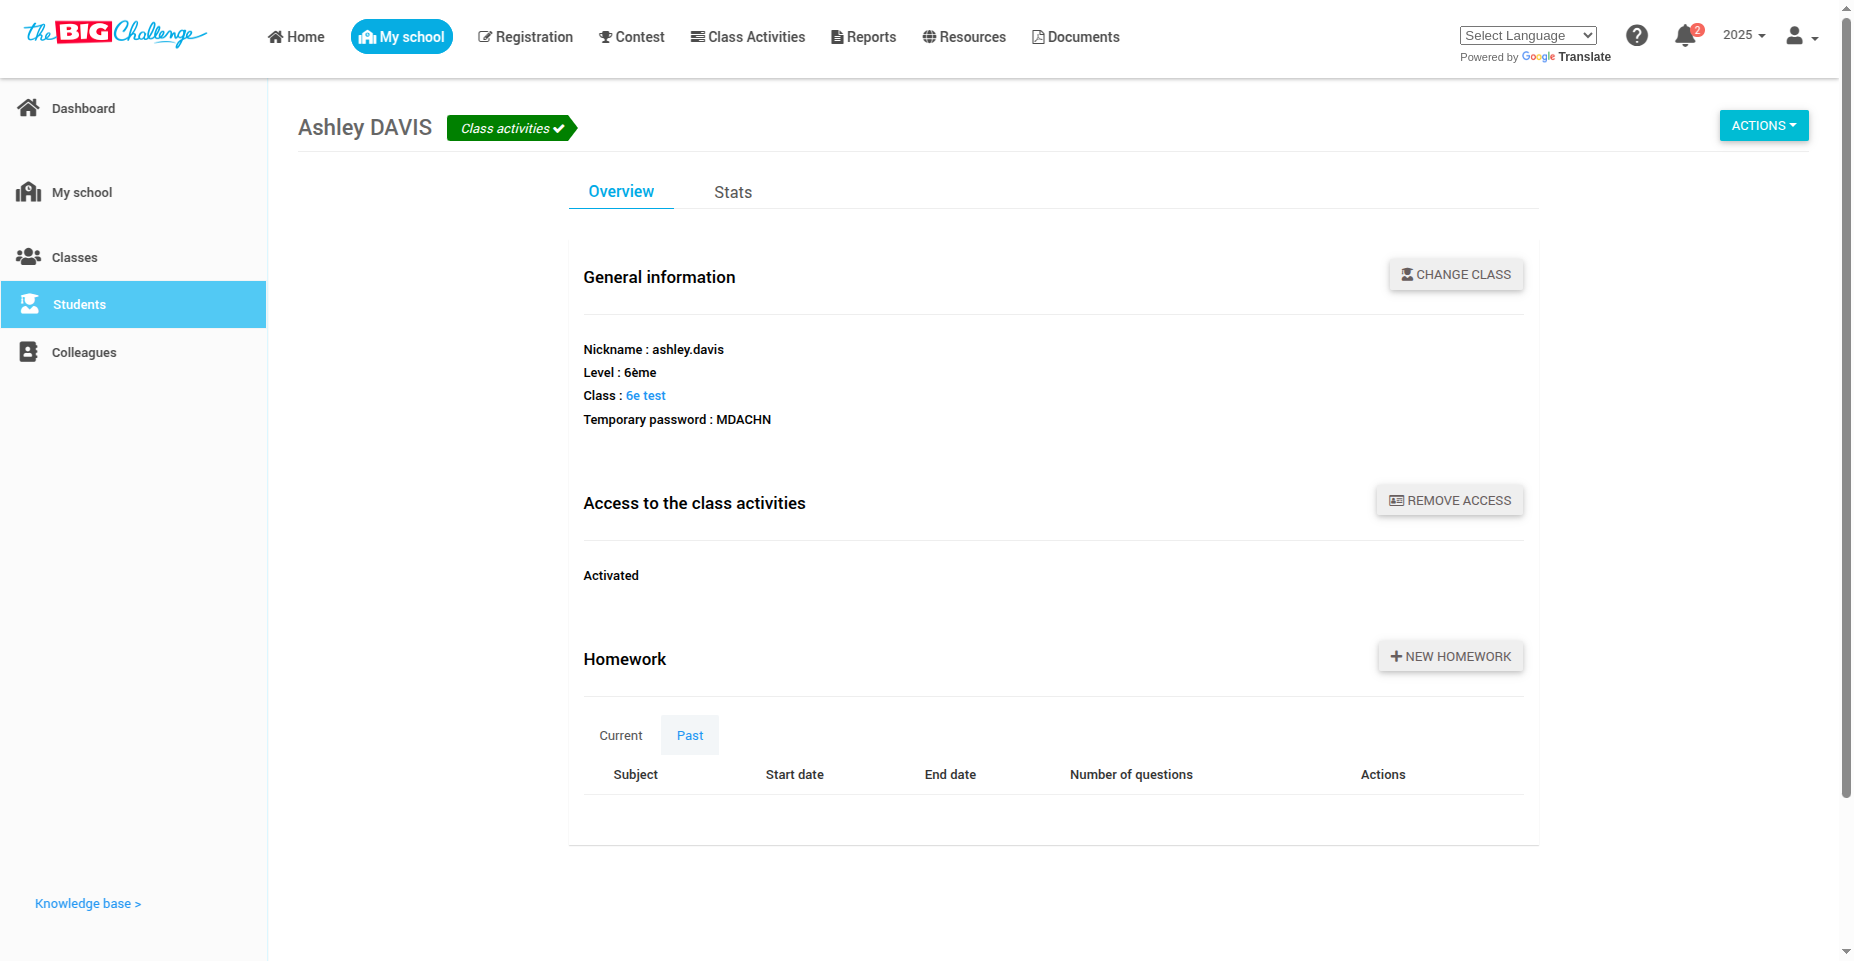
Click on a student's name to open their Student Details page. Here you can find their nickname (username).
🔎 Step 4: Check Login Credentials
Scroll to the General Information section to find the student's temporary password, if available.
✏️ Step 5: Change a Student's Password
Click the Action button and select Change Password. Enter the new password and click Submit. The password will be updated immediately.
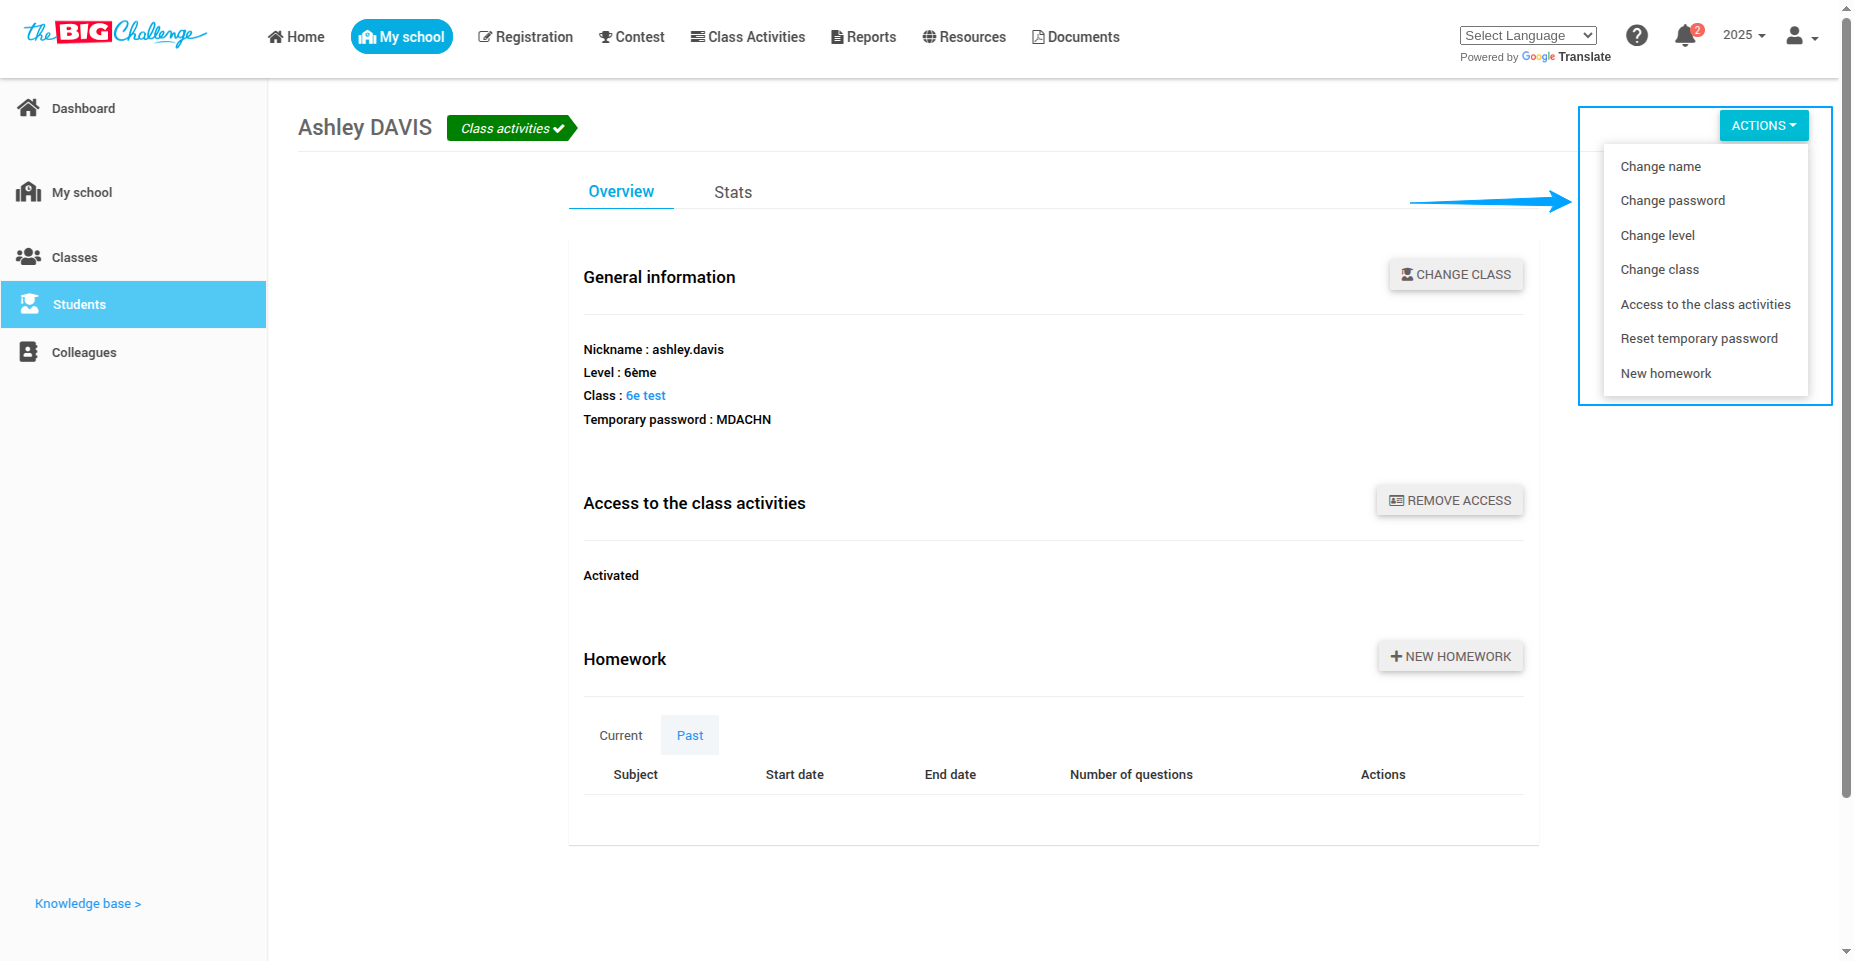
🔄 Step 6: Reset a Temporary Password
Click the Action button and select Reset Temporary Password to generate a new temporary password for the student.
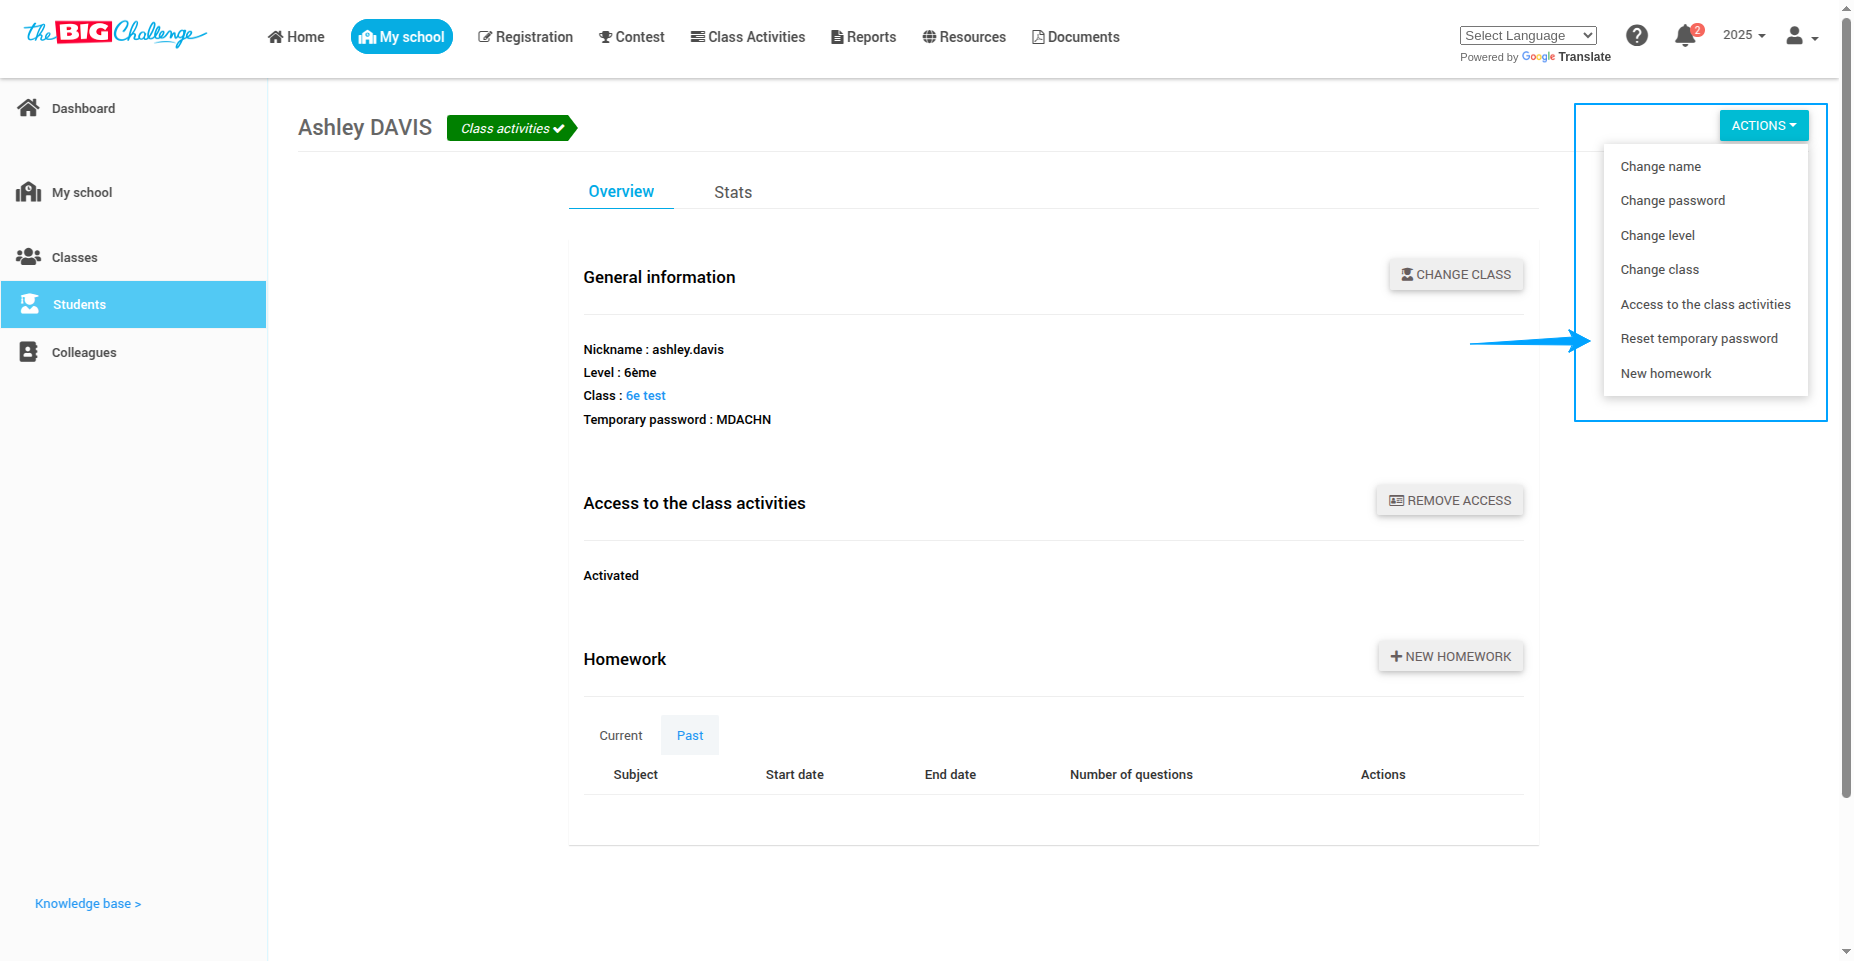
✅ Step 7: Bulk Reset Temporary Passwords
Select multiple students, click the Action button, and choose Reset Temporary Password to reset for all selected students at once.
💡 Important Note:
Only temporary passwords will be displayed on the student page and in the Instructions to Join document. Passwords changed manually by students or teachers are not visible.
🎯 And that's it! Now you know how to easily help your students log into The Big Challenge application.
🎥 Watch the Full Tutorial
3. Changing Student Details
👋 Welcome to The Big Challenge. This tutorial will guide you through changing a student's name, level, and class.
🔐 Log in to your teacher account and go to the My School tab to access your school dashboard.
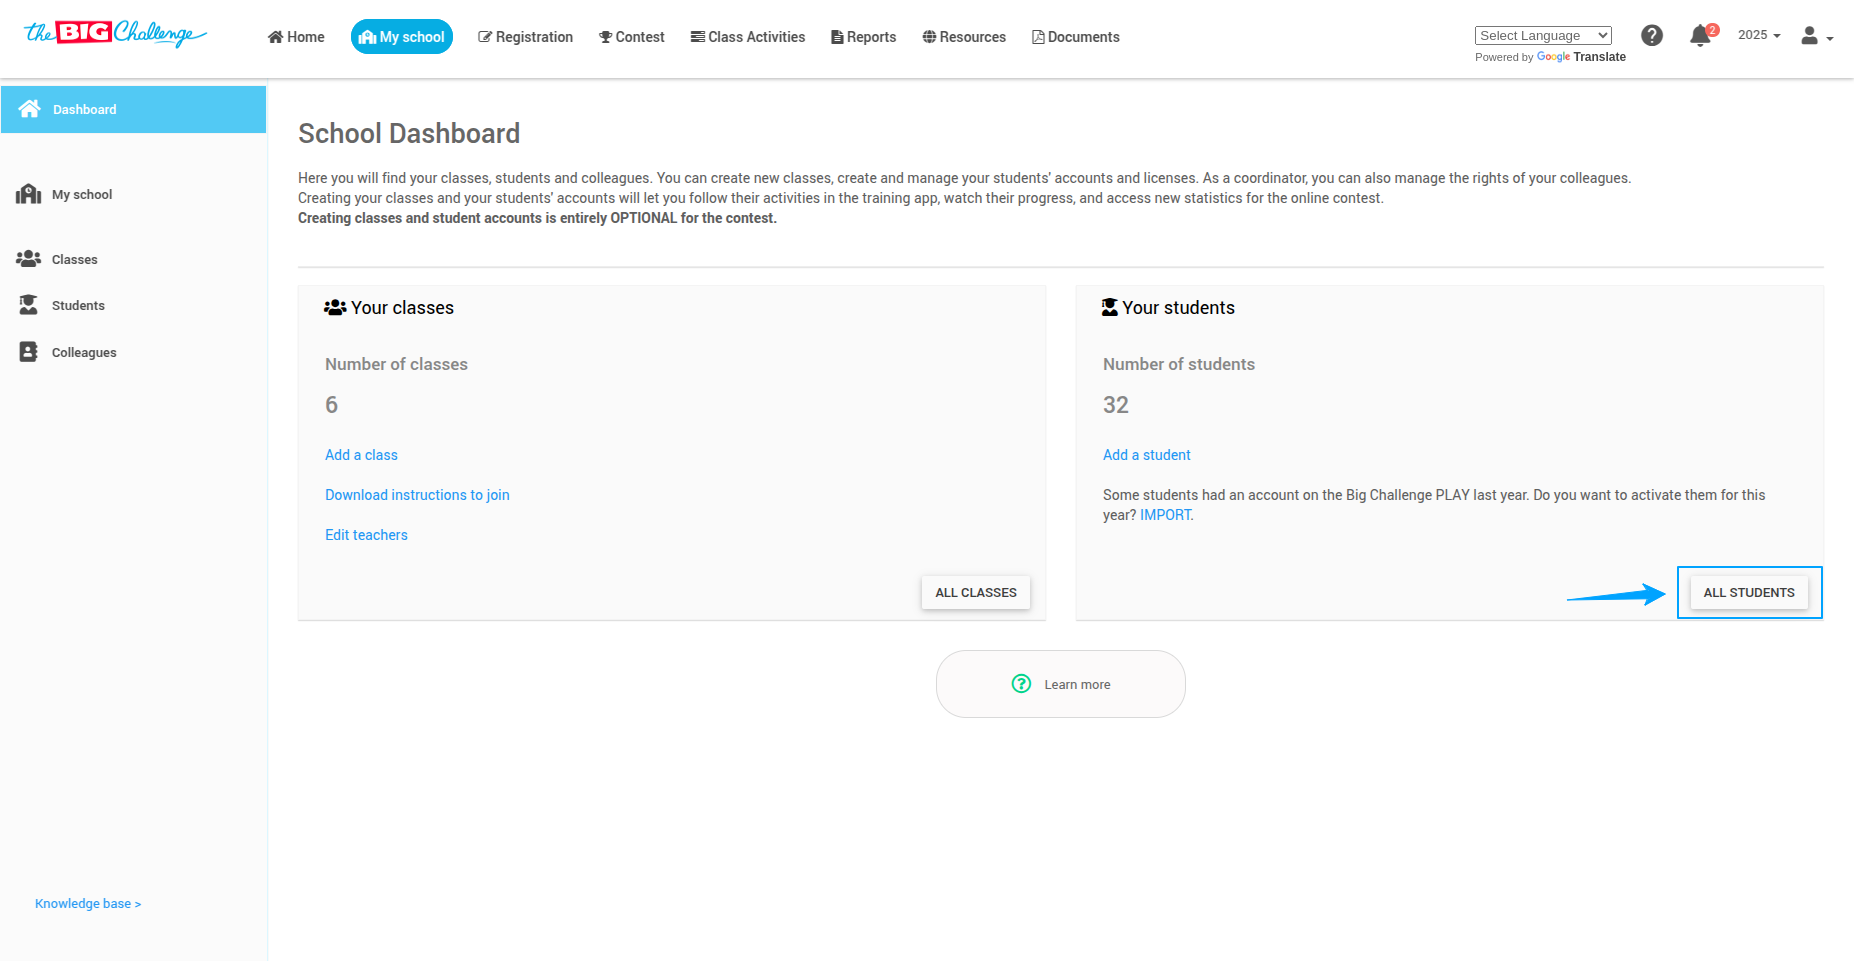
➡️ On the right side of the page, click All Students to view the full student list.

👀 Click on a student's name to open their Student Details page.

Edit Student Information:
🛠️ Click the Action button to see all available editing options.
✏️ Select Change Name to update the student's first name, last name, or nickname.
📚 Click Change Level to adjust the student's academic level.
🏫 Click Change Class to move the student to another class.
💡 Pro tip: When changing a class, ensure students are reassigned properly to avoid losing progress in class activities.
🚀 And that's it! You've successfully edited the student's details. Quick and simple!
🎥 Watch the Full Tutorial
5. Searching for a Student
👋 Welcome to The Big Challenge. This tutorial will guide you through the process of searching for a student.
There are two ways to search for a student:
Manual search: Browse the alphabetical list in the "Students" tab.
Search tool: Use the search bar to type the student’s name and find them instantly.
🔐 Log in to your teacher account and go to the My School tab to access your school dashboard.

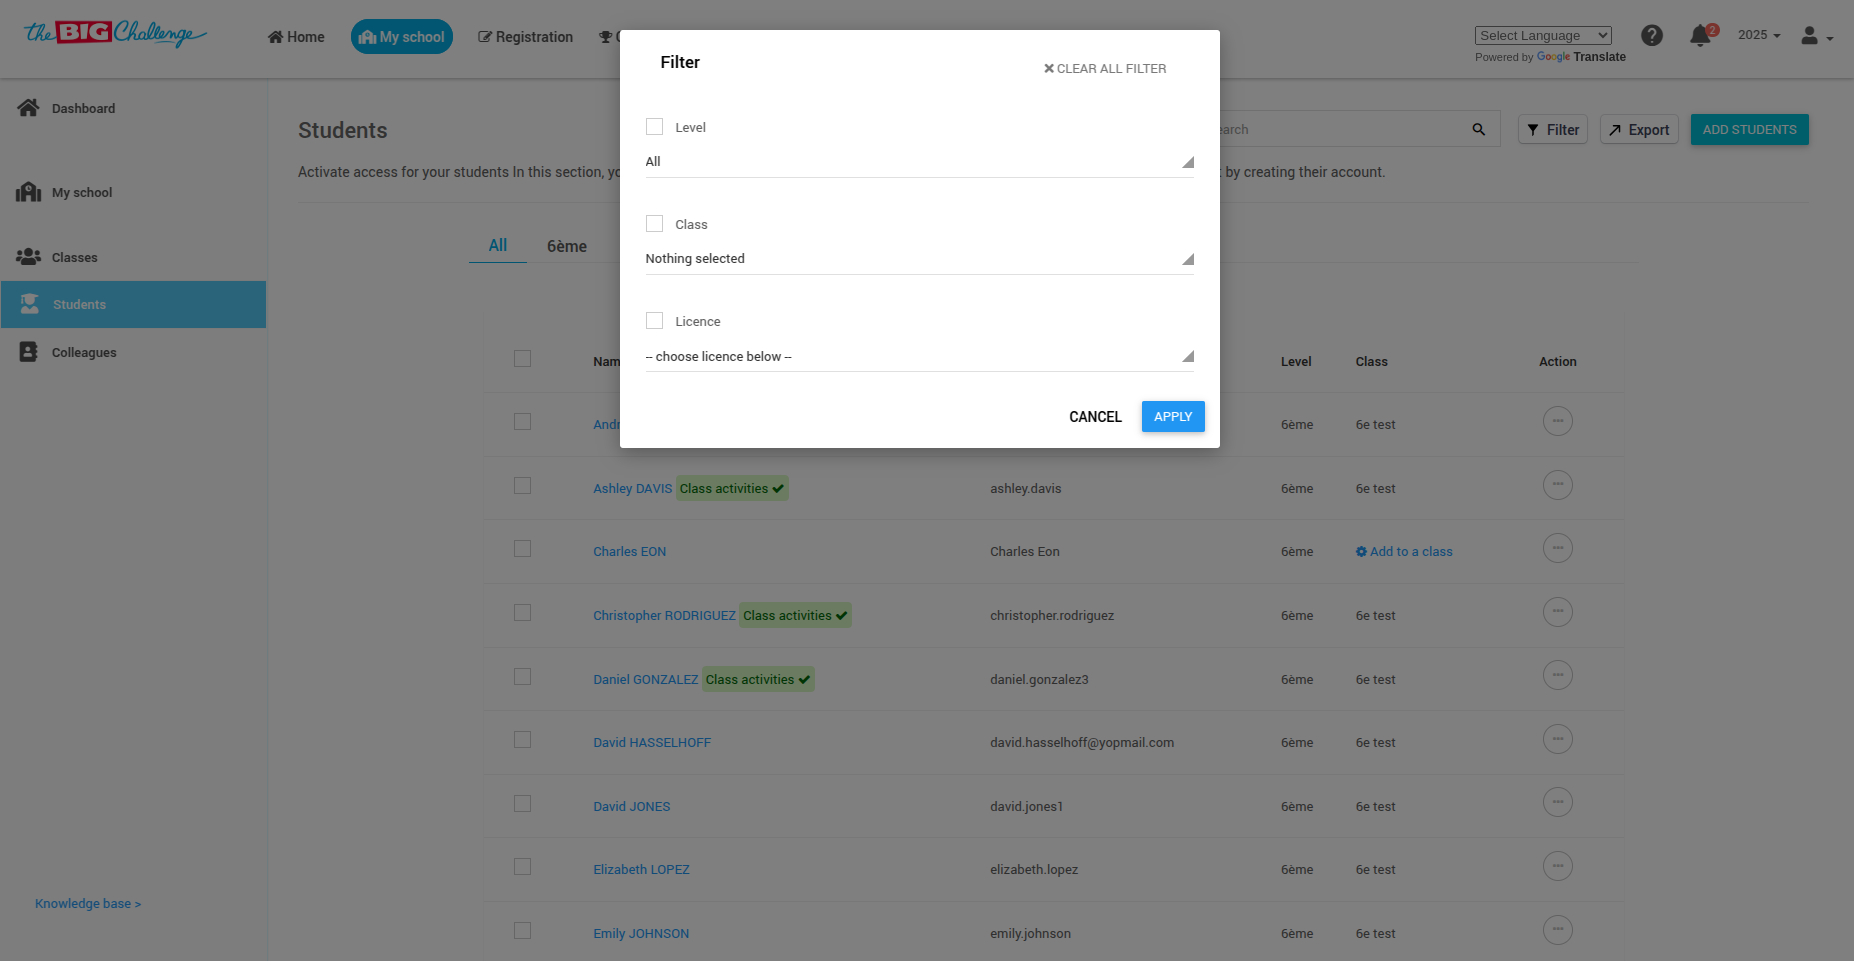
➡️ In the left-hand menu, click All Students to view the list of students organized by level.
Filtering Options:
🔎 If you know the level of the student, you can use the filters to narrow down the list:
Click on the Filter icon.
Choose to filter by Level, Class, or License.
Search by Name:
🔍 Use the search bar at the top of the page to type in the student's name and click the search button.
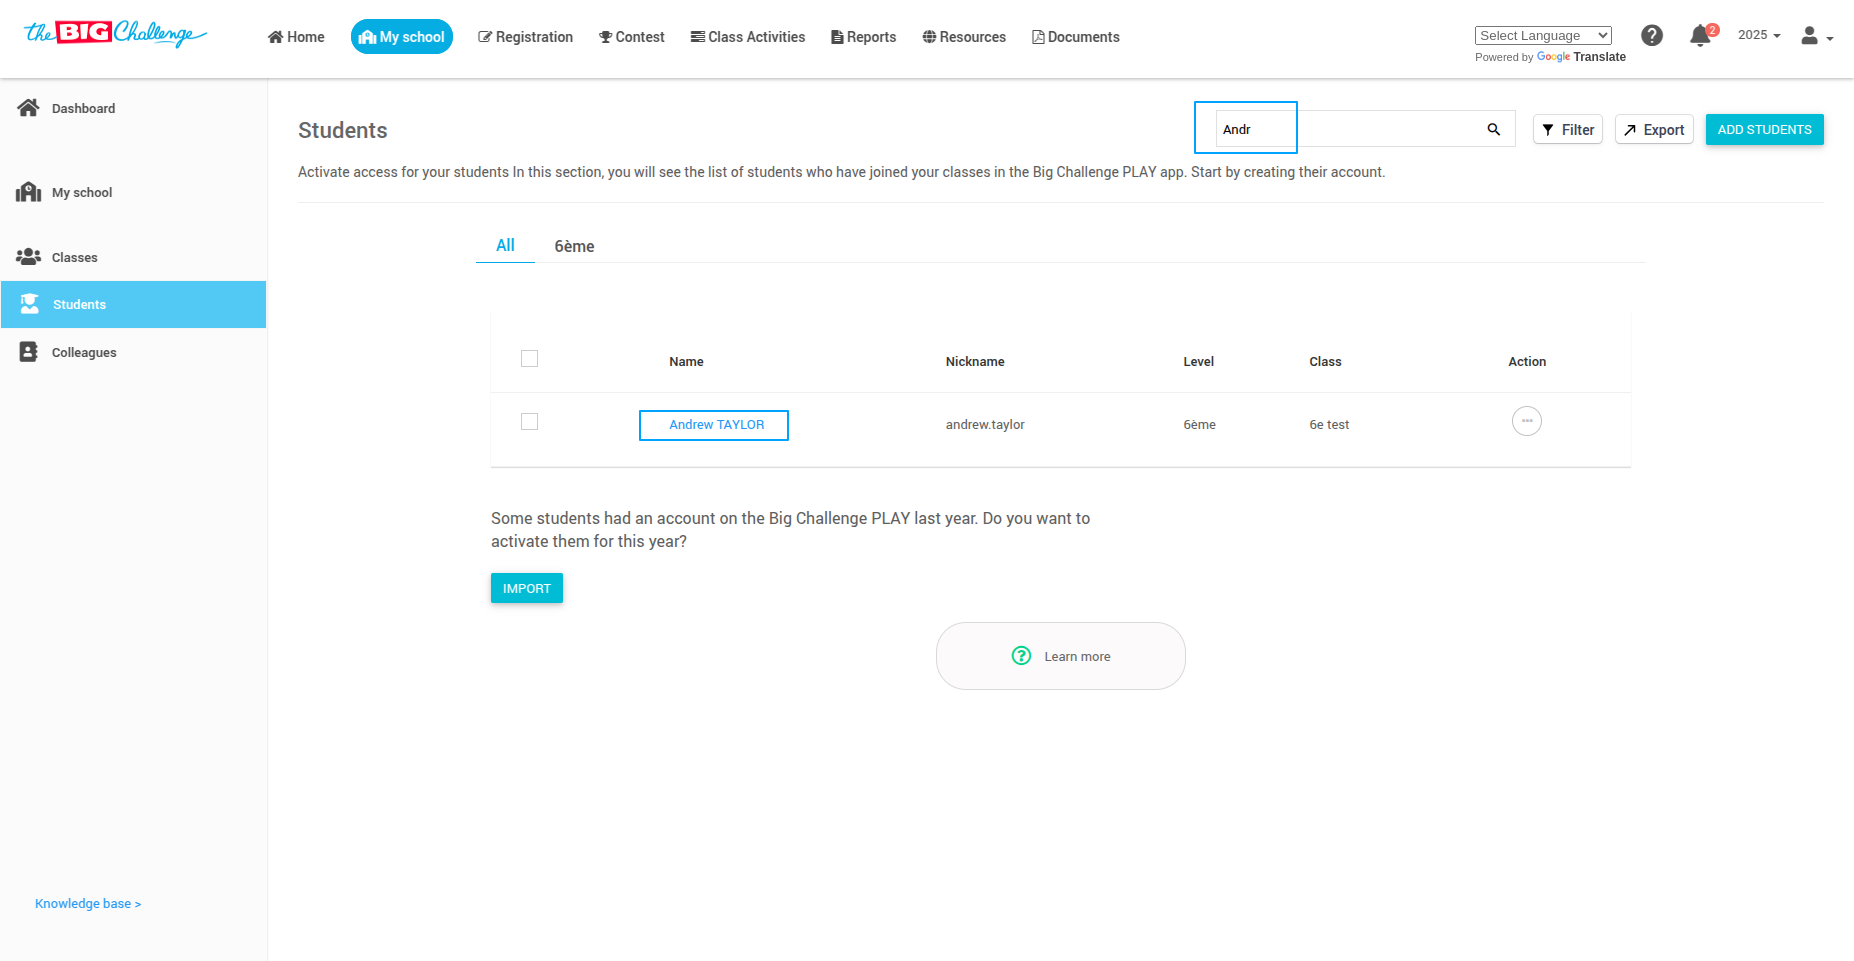
👀 You will see a list of matching student names displayed.
🚀 And that's it! You can now easily find a student by searching or filtering. Thank you for watching, and happy teaching!
🎥 Watch the Full Tutorial
6. Changing a Student's Class
👋 Welcome to The Big Challenge. This tutorial will guide you through changing a student's class.
🔐 Log in to your teacher account and go to the My School tab to access your school dashboard.

➡️ Click on All Students from the left-hand menu to view the student list.

👀 Find and click on the student's name to open their Student Details page.

🔧 Click the Action button and select Change Class, or click the Change Class button next to the student’s name.

🏫 Choose the new class from the list of classes, and click the Choose button next to the desired class.
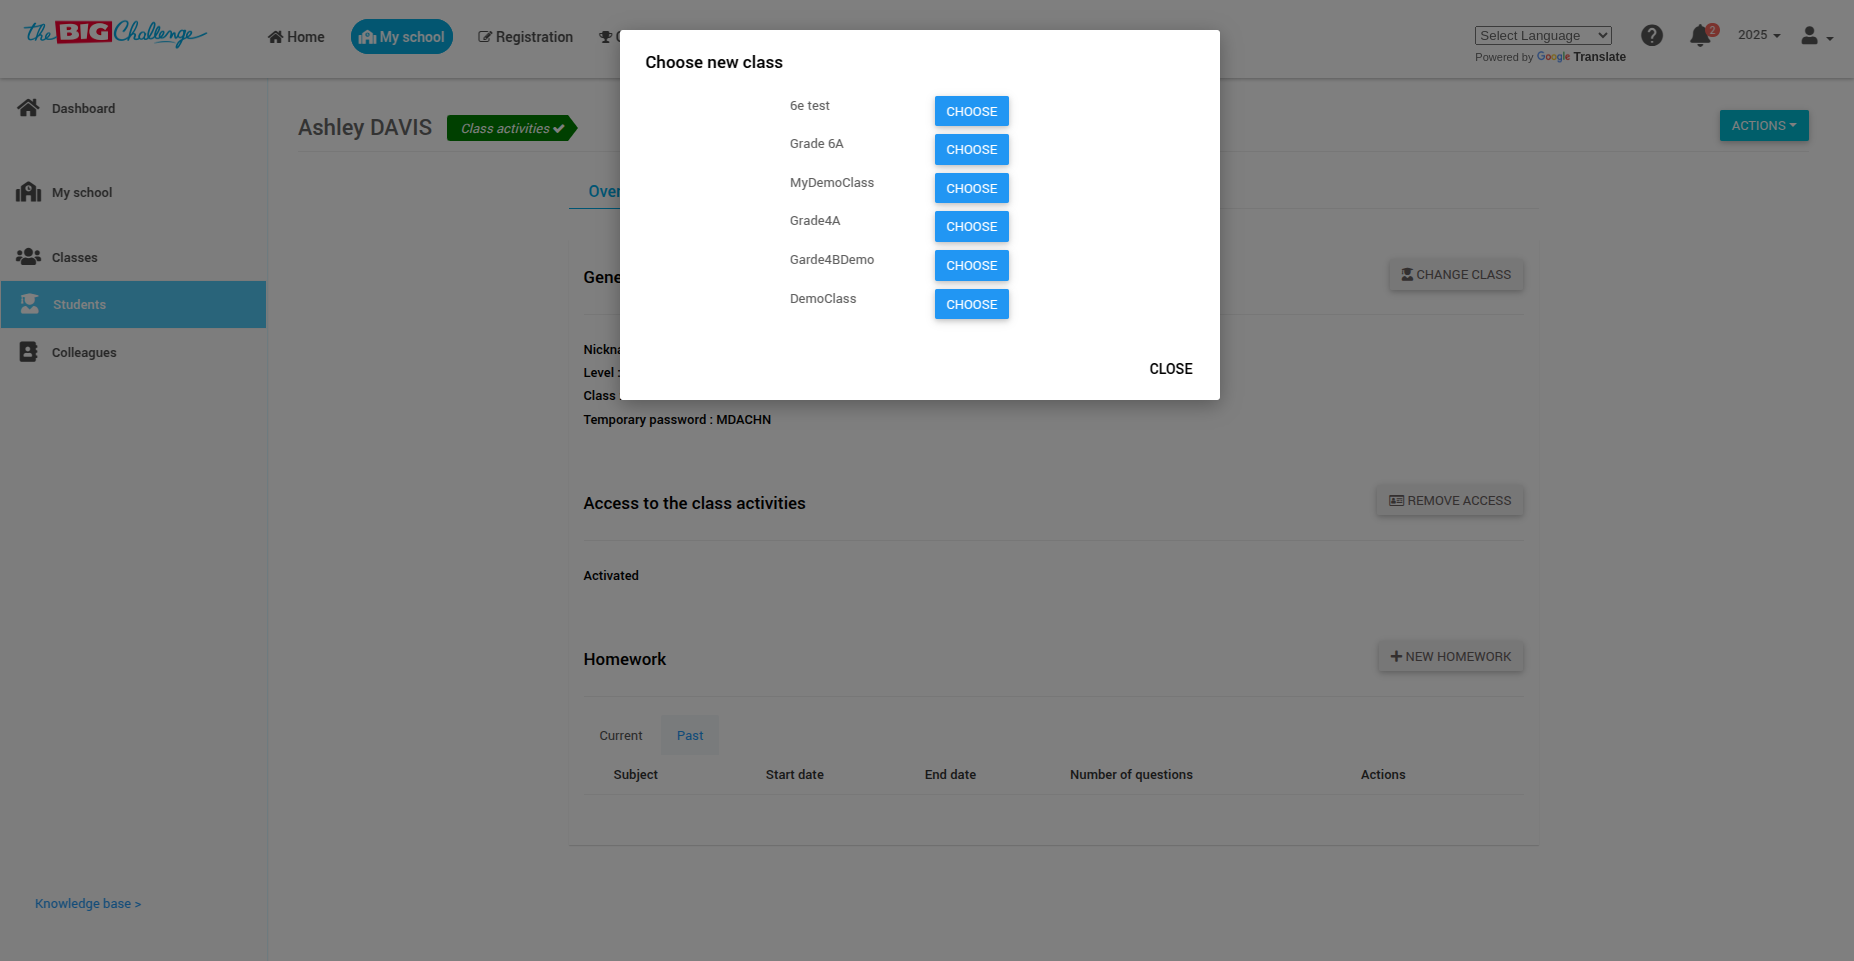
✅ The student's class assignment will be updated immediately.
🚀 And that's it! You've successfully changed the student's class. Thank you for watching, and happy teaching!
🎥 Watch the Full Tutorial
7. Viewing Account Status
Check if a student’s account is active or inactive.
Steps to view account status
1️⃣ Go to "Classes".
2️⃣ Click on the class to view the status of all student accounts.
💡 Pro tip: Inactive accounts may require action, like re-sending activation emails or resetting login details.
8. Deleting a Student
👋 Welcome to The Big Challenge. This tutorial will guide you through the process of deleting a student.
🔐 Log in to your teacher account and go to the My School tab to access your school dashboard.
➡️ Click on All Students from the menu on the left-hand side to view the student list.

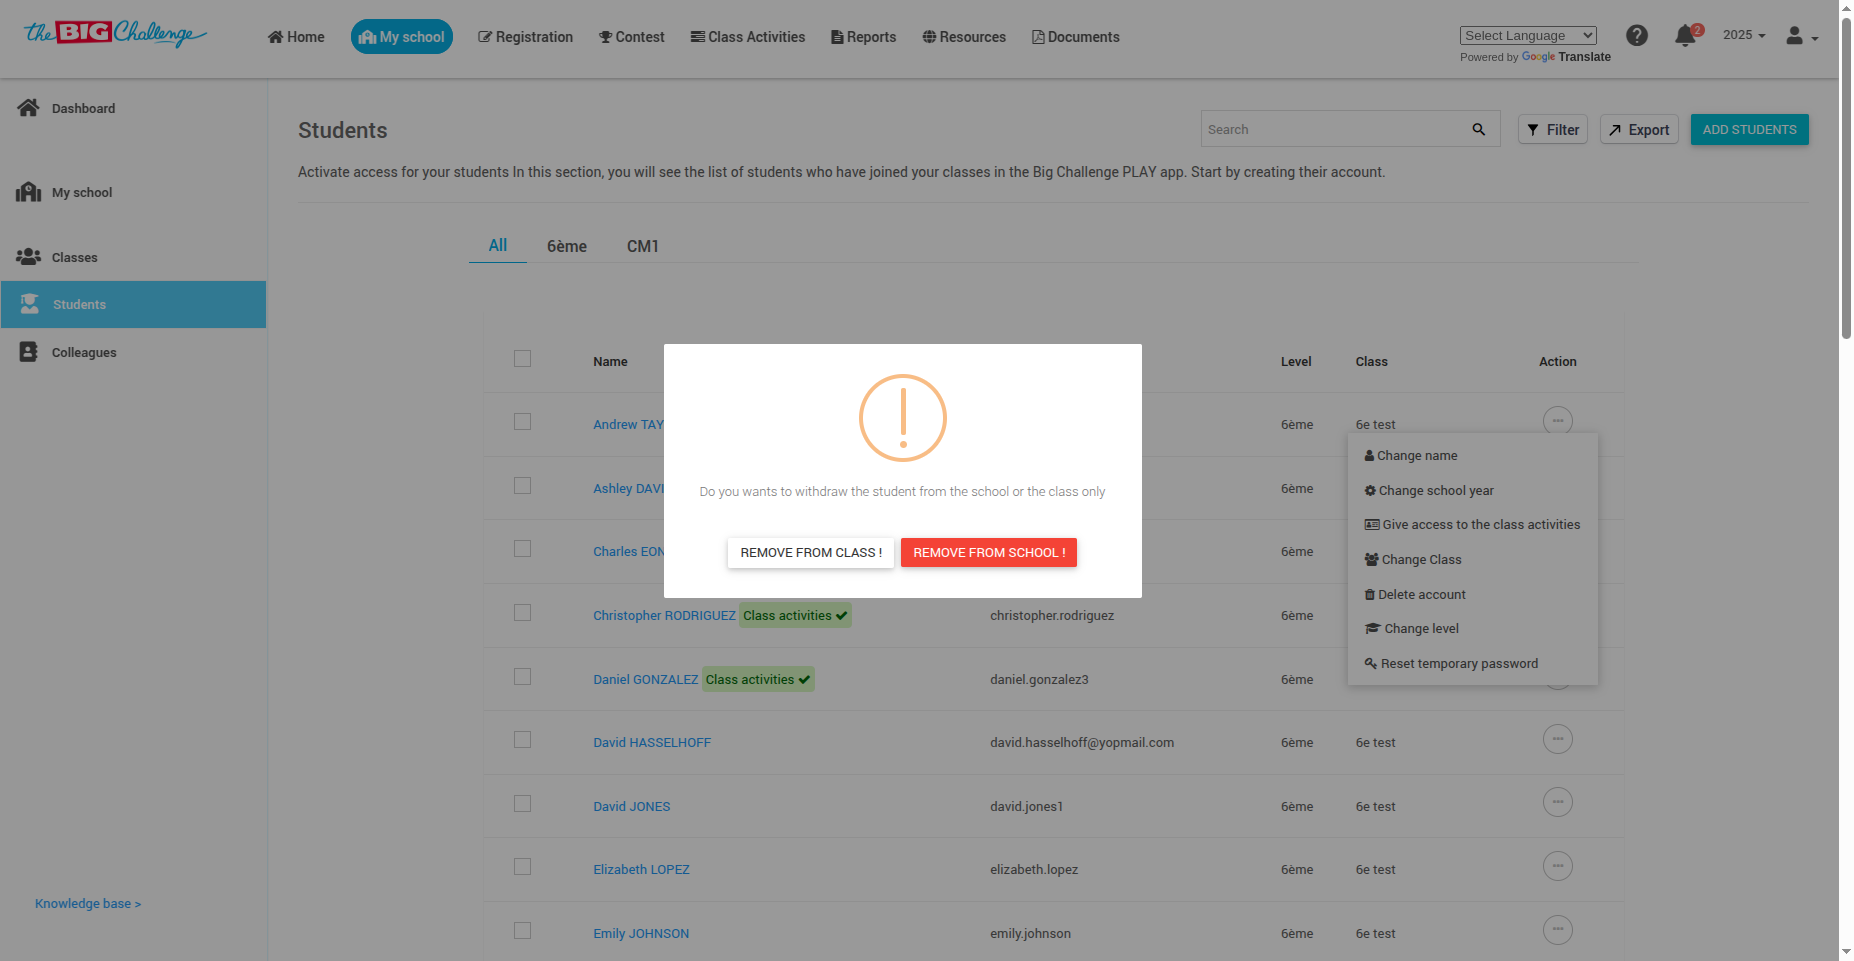
👀 Find the student you want to remove. Click on the Action button next to the student's name.

🗑️ From the dropdown, select Delete Student.
Important Notes Before Deleting:
⚠️ Deleting a student will remove their account permanently from the class or the school, depending on your choice.
📄 Consider exporting student data beforehand if needed.
✅ Confirm the action by clicking Delete in the confirmation pop-up.
🚀 And that's it! You've successfully deleted the student. Thank you for watching, and happy teaching!
🎥 Watch the Full Tutorial
9. Changing a Student's School Year
👋 Welcome to The Big Challenge. This tutorial will guide you through changing a student's school year.
🔐 Log in to your teacher account and go to the My School tab to access your school dashboard.

➡️ Click on All Students from the menu on the left-hand side to view the list of all students.

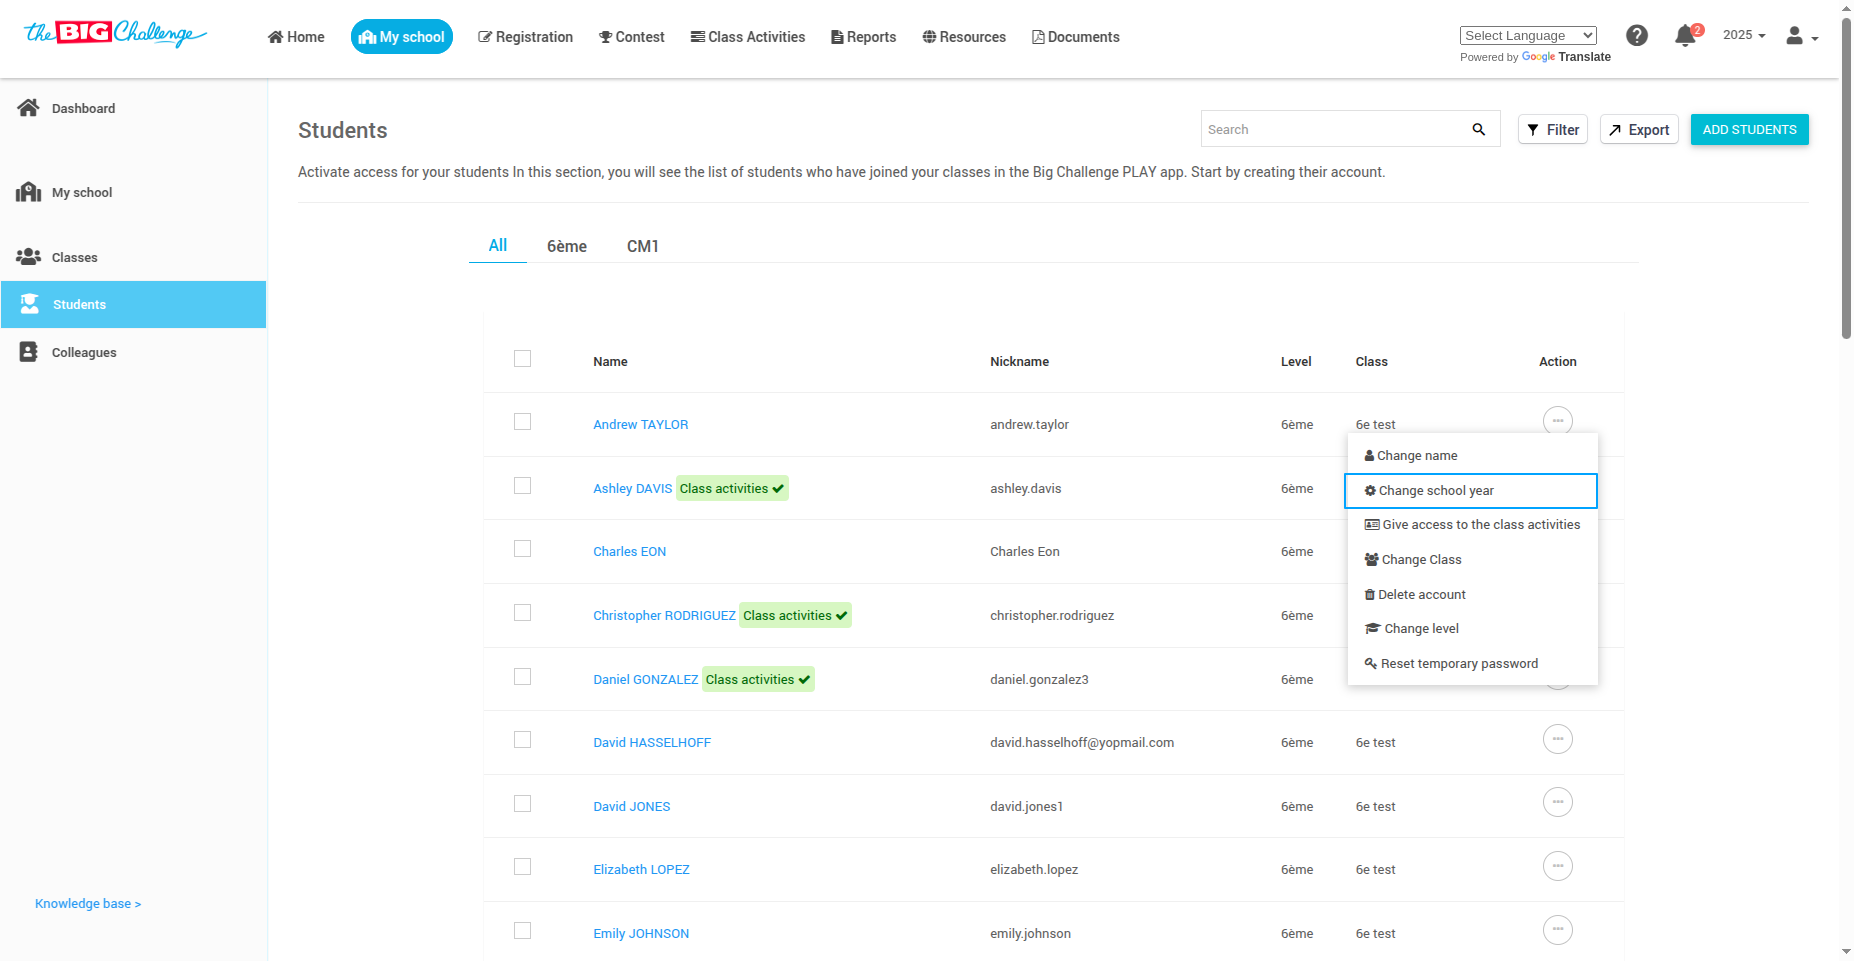
👀 Find the student whose school year you wish to change. Click on the Action button next to the student's name.
🔄 Select Change School Year from the dropdown menu.
🗓️ In the popup, choose the correct school year from the list of available options and click Submit.
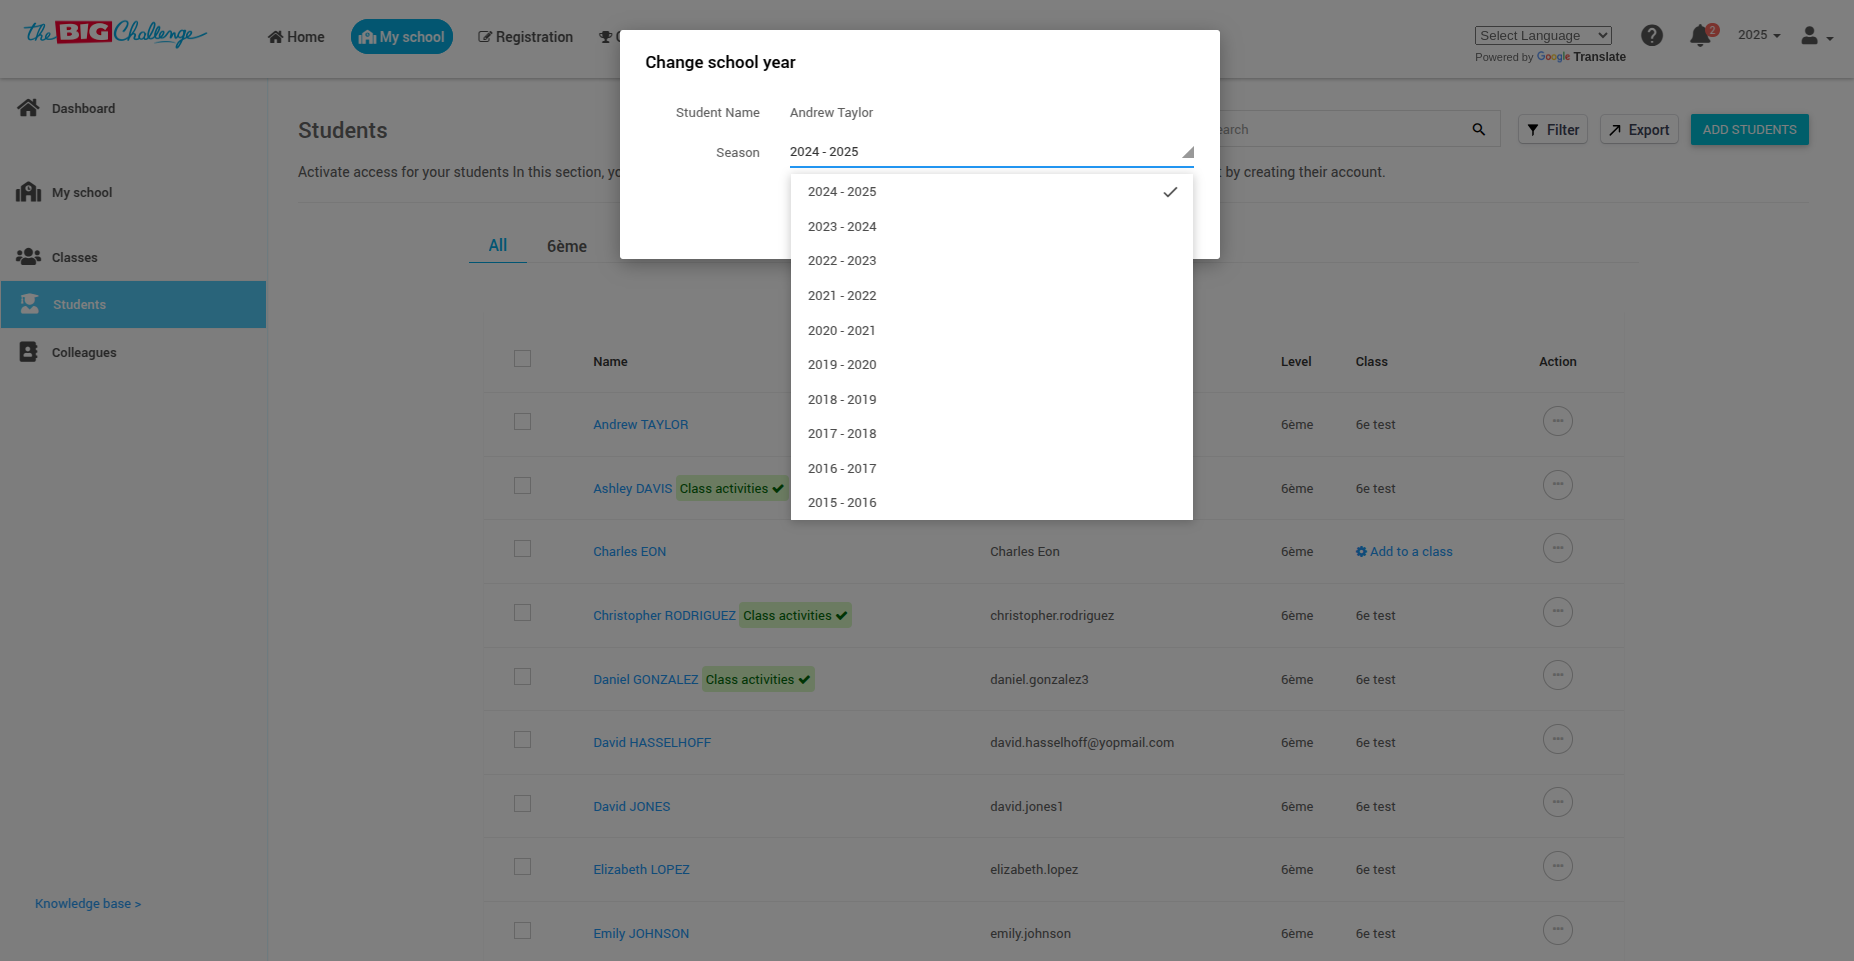
✅ The student's school year will be updated immediately.
🚀 That's it! You've successfully updated a student's school year. Thank you for watching, and happy teaching!
🎥 Watch the Full Tutorial
10. Downloading Student Information
👋 Welcome to The Big Challenge. This tutorial will guide you through the process of downloading student information.
🔐 Log in to your teacher account and go to the My School tab to access your school dashboard.

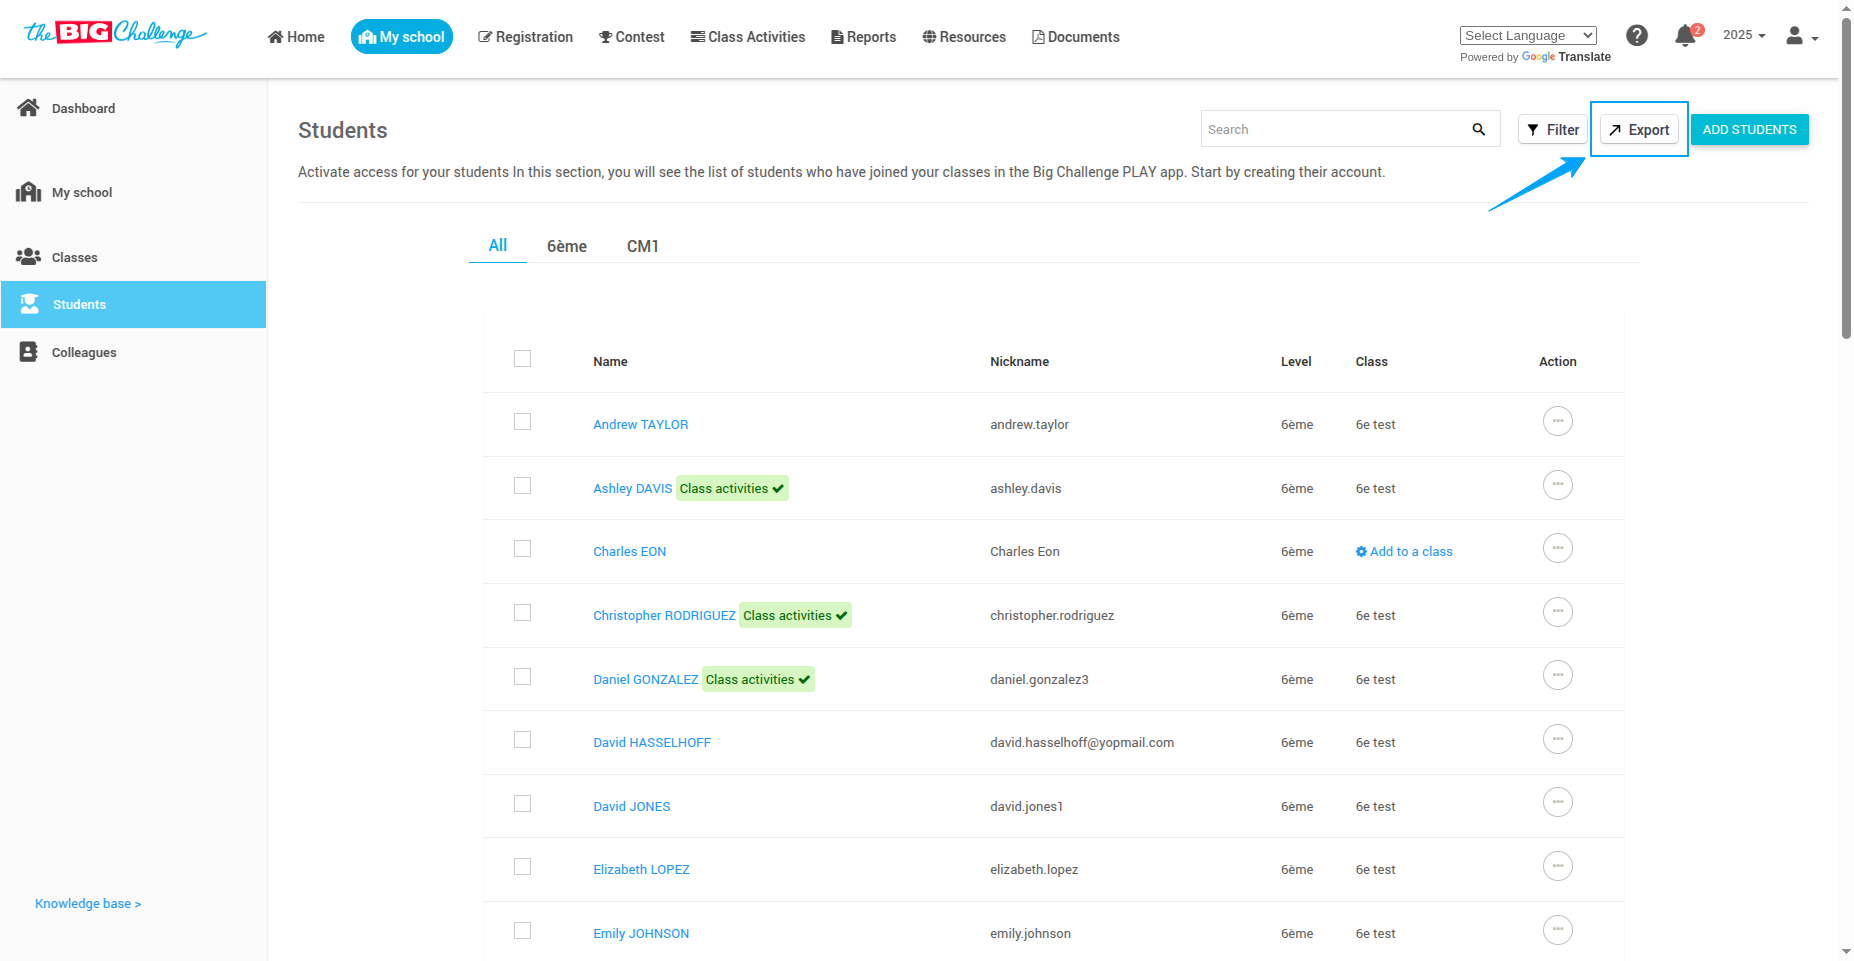
➡️ Click on All Students from the menu on the left-hand side to view the list of all students.

⬆️ In the top right section of the page, locate and click the Export button.
💾 From the dropdown, select Download CSV.
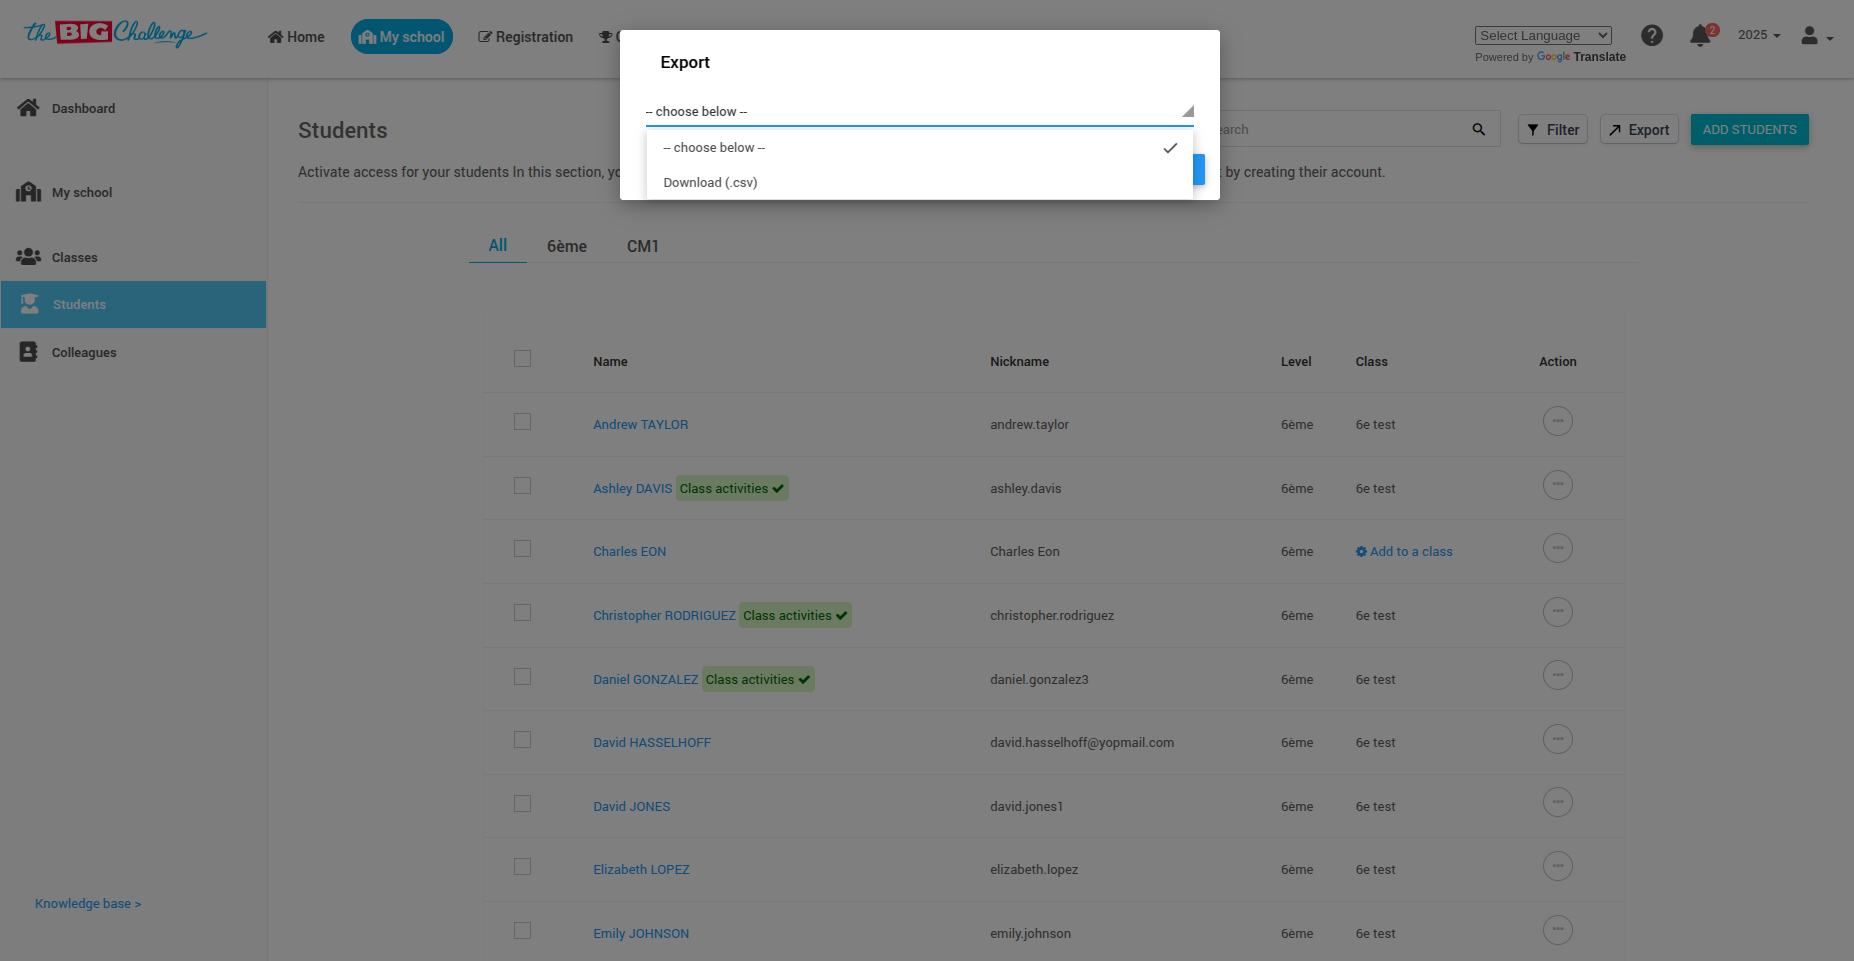
✅ A CSV file containing all student information will now be downloaded to your computer.
🚀 And that's it! Thank you for watching, and happy teaching!
🎥 Watch the Full Tutorial
10. Student Data Security
🔒 At The Big Challenge, we prioritize student privacy and data security.
How is student data protected?
✅ Only usernames and passwords are required to create accounts.
📧 Email addresses are optional and only used for password recovery.
🔒 Data is never shared with third parties.
💡 Pro tip: Encourage students to use strong passwords and update them regularly for maximum security.
🚀 That's it! Thank you for helping protect your students' data and keeping them safe online.
11. Student Data Security
We prioritize student privacy and data security.
How is student data protected?
Only usernames and passwords are required.
Email addresses are optional and only used for password recovery.
Data is never shared with third parties.
💡 Pro tip: Encourage students to use strong passwords and regularly update them.
12. Why Can't I See All My Students?
f you can't see all your students, it may be because they are in a different school year.
What to do?
1️⃣ Check the school year filter in the top-right corner.
2️⃣ If necessary, move students to the current year using "Change season".